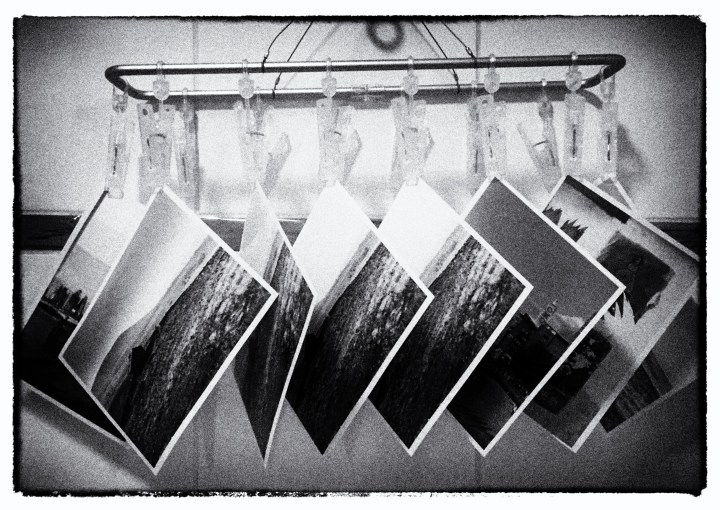
When last I wrote on these hallowed pixels (that’s been awhile, my apologies), I was talking about scanning medium format film with an Epson V600. A little over a year ago now I decided that I quite liked this whole “scan a bunch of images in a batch” workflow and decided to look for something that would also handle 35mm in reasonable quality. Well those options are incredibly limited, so I ended up dumping a bunch of cash on an Epson V850, Epson’s high end flatbed. This boasts increased resolution and a large negative scanning area capable of handling up to 3 strips of 35mm film and the ability to even do up to 8×10 if ever the madness truly takes me.
You have to accept with a flatbed scanner you’re never going to get the full resolution of the film and the smaller the negative size the more this impacts. For me the bare minimum acceptable resolution for making up to A3 size prints and looking nice on a high DPI monitor is about 12 megapixels, this needs a resolution of approaching 3000 DPI to achieve with a 35mm frame. That resolution is very much the upper end of what you can expect with a high end flatbed, but with some careful post processing you can get close enough.
Hardware
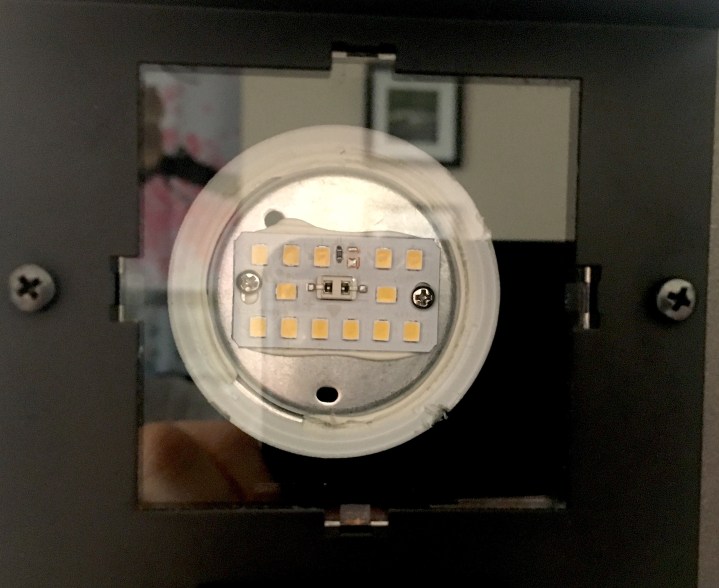
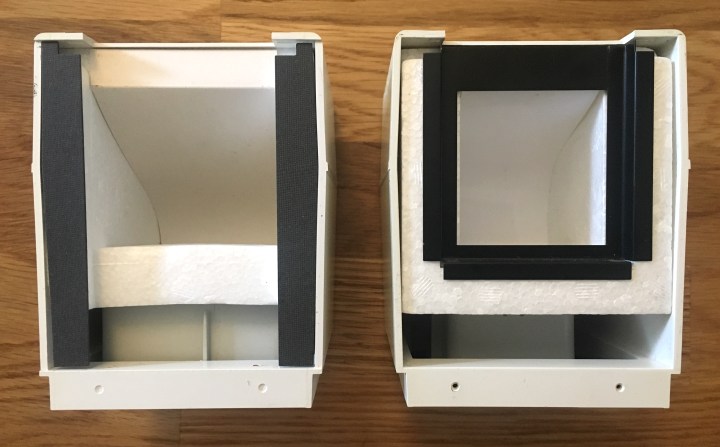
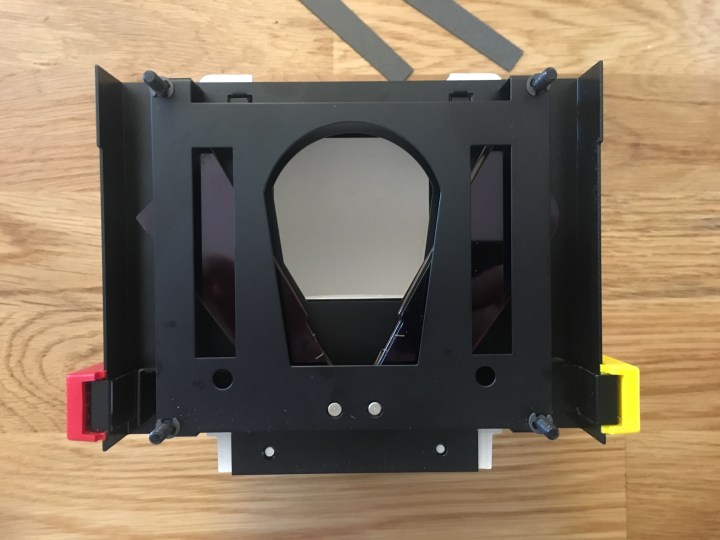
Compared to the V600, the V850 is an absolute unit with a very large boxy design. A neat little translucent strip in the lid houses a blue LED that shows the progress of the transparency unit’s light across the negative which is rather a fun detail. The film holders are slightly more substantial than the 600’s and all have ANR (Anti-Newton Ring) glass inserts to help hold the film flat while avoiding those pesky newton rings that can occur when the film isn’t perfectly flat and reflections cause interference patterns. The film holders all have height adjustment sliders to fine tune the focus. These make a subtle change to the sharpness of your scans, slightly improving things when fine tuned. I find it’s easy for the sliders to get knocked out of position though, especially on the 35mm holder which has a lot of them, so attention needs to paid that none have drifted when swapping negatives. The v850 comes with a full duplicate set of negative holders so you can streamline your workflow a bit and have up to 6 strips of 35mm or two strips of 120 mounted and ready to go at any one time. In practice I just use the one set and keep the others as spares should I ever manage to break or scratch any of the glass inserts.
The v850 is still using an antiquated USB 2 connection and the scan speed is pretty slow at working resolutions. How much of this slow speed is necessitated to get a good result and how much is caused by the data processing and transfer speed of the scanner I don’t know. Despite the slow speed however you can set up a batch scan job so you can at least get on with something else while the scanner whirs and grinds its way through your images.
Software
The scanner comes with SilverFast, which I kind of low key hate, and Epson Scan 2 which is kinda good but bad at batch scanning and inexplicably slow even on a powerful system. Epson Scan will be fine for most people and perhaps is less sluggish on Windows? The main issue I have with it is that it overcrops into the image area when auto detecting frames and it’s a tedious process to mark out 18 frames (three strips of six shots) when doing 35mm. At least it can capture 16 bits per channel TIFFs without costing you a fortune to upgrade like SilverFast. Epson Scan also is quite good at producing pleasing colours from negatives which is not to be sneezed at. Personally I use the scanner with VueScan in combination with Negative Lab Pro. VueScan is a confoundingly badly designed piece of software, but once it’s setup “right” it does get the job done. Setting up a batch scan is a painful process as with Epson Scan, but at least it remembers where the frames are so if you have to scan a bunch of 35mm or 120 it’s not too bad, just don’t alternate between formats more than you have to.
Again how any of this scanner software, most of which has been around for getting on 20 years now, still can’t reliably detect frames or even have profiles for the few scanners still on the market that could at least ball park where the negatives are is baffling. But in the cursed world of film digitisation you just have to learn to live with all this bizarreness and accept it will never get better. Just remember DSLR scanning is also a massive pain in the arse too.
Results
Most reviewers who have spent time with resolution test charts, fluid mounting and so on have concluded the Epson pro scanners can achieve around 2400 DPI in terms of real resolution. It’s not amazing, but it’s just enough for 35mm and plenty for medium format or larger. Allegedly there are minor optical differences between the V800 and V850, but I suspect these were dreamed up in Epson’s marketing department as I’ve never seen any evidence of one producing better results than the other. The V850 does produce markedly better results than the V600 though, night and day with 35mm and still noticeably better with medium format. I scan at 3200 DPI and downsample in Photoshop, typically to around 26 megapixels for 6×4.5, 36 megapixels for 6×6 and about 12 megapixels for 35mm. I find Photoshop’s smart sharpen filter tends to provide better results than simply using an edge detect sharpen in either the scanner software or Photoshop. As I mentioned above, I use Negative Lab Pro to handle the colour conversion, so VueScan is relegated to simply providing a decent uninverted tiff as its colour correction is cumbersome and unintuitive to use
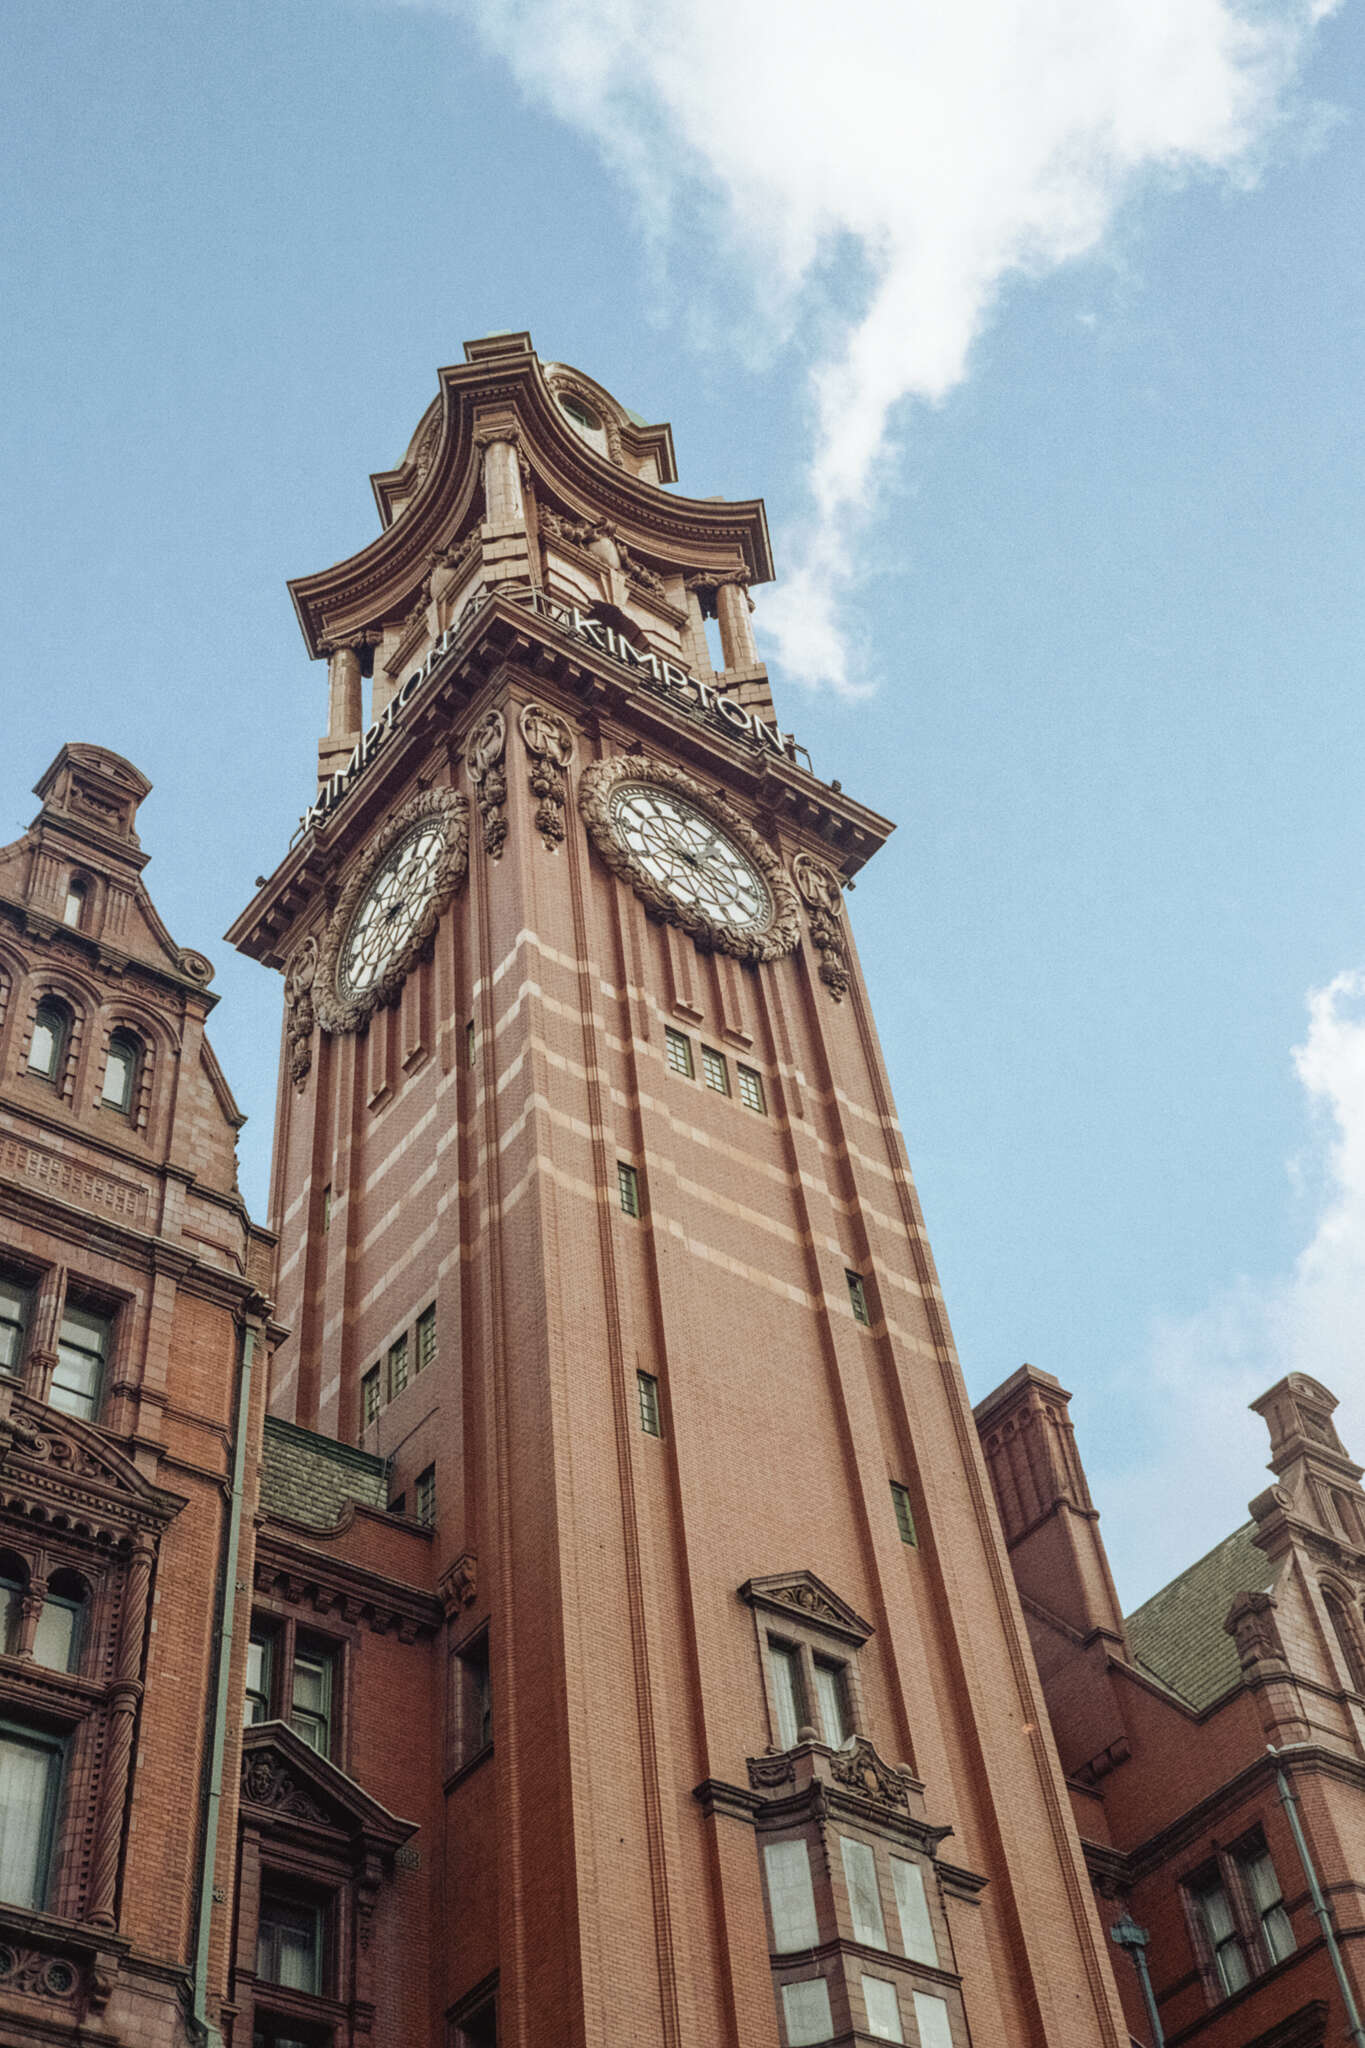
Here’s a 35mm shot from my Rollei 35 SE on Kodak Gold 200 with a 100% crop on the right. As you can see the details are pretty decent and you can make out the individual bricks in the tower in this 12 megapixel digitisation (4319×2879). It’s possible to squeeze a little more perceptual detail by cranking up the sharpness slider in Lightroom, but I’ve left it with the basic smart sharpen applied to the TIFF in Photoshop here.
Could you squeeze more details from this negative with a better scanner or even DSLR scanning? Almost certainly, but you’d probably also make the grain a lot more visible and unless you wanted to print a truly massive image or hugely crop in would you actually gain anything? For me that answer is, “not really”. This is why I think a flatbed scanner with this level of resolution is good enough 90% of the time for 35mm and pretty much 100% of the time for medium format or larger. For that remaining 10% where more resolution is desirable on 35mm I have my PlusTek 8200 which can achieve 4000 DPI of real resolution, and for the occasional shot or even whole roll where I can make use of that it’s a good solution, but the thought of spending literally all day manually feeding each frame of multiple rolls of 35mm is very unappealing.
Is it worth it?
I bought my V850 for about £900 in 2021, since then it seems like the slightly cheaper V800 has been discontinued but despite the rampant inflation over 2022 the price still seems to be in the same ballpark. Now that’s no small chunk of change and I appreciate this scanner will be out of reach for a lot of film shooters. If you don’t need to scan 35mm or don’t mind using a cheaper flatbed scanner in combination with a dedicated 35mm scanner then there are other decent options. If you only need 35mm and don’t mind manual feed then there are a number of decent options for around £300. Compared to the cost of buying and setting up a full DSLR or mirrorless scanning rig with a 1:1 macro, good light source and film holder I think the V850 is still quite a bit cheaper, but your mileage will vary depending on what other gear you already own. For me this Epson is currently the best multi-format film scanner on the market that can still be bought new.
Back in July I wrote about switching away from DSLR based film digitisation and my experiences with a PlusTek 8200i film scanner. The PlusTek has been great, to the point where I’ve been letting my medium format gear gather dust and a few films I shot back in the spring had been left waiting for me to muster the enthusiasm to once again try and get my DSLR setup put back together.
I came to the realisation at the end of October that I was just done with DSLR scanning full stop and that I needed a solution for medium format I would actually use. I once again found myself looking at flatbed scanners as the only affordable and available option. Would the quality be acceptable? I spent quite a long time browsing Flickr shots digitised with various Epson scanners, reading old forum threads and so on before finally deciding that for £230 the Epson V600 was worth a punt and that I could simply return it if all it produced was a blurry mess.
The scanner arrived last Friday and I eagerly set about scanning one of those films that had been waiting months for my attention. Using Epson’s scanner software it was pretty quick and efficient. Soon I had three 6×6 shots digitised. The quality was ok, at 2400dpi the scans were detailed enough but things were somewhat soft looking, even after some generous unsharp masking in Photoshop. The colours were excellent however, and even thinly exposed shadow areas came out much better than I’ve ever managed with a DSLR scan, where when you push the extremes you tend to just get noise or find unwanted reflections on the film surface.
So next I set about trying to improve the sharpness. I’ve read that flatbed scanners often have a bit of variability in terms of the height above the glass where they are in optimum focus. Given the supplied negative holders are pretty flimsy and don’t hold the film especially flat, I thought I’d try the Lomo Digitaliza, that I’d previously bought for DSLR based digitising. I loaded it up with the same strip of film and carefully positioned it under the scanner’s transparency unit. On the V600 the transparency unit forms a strip that runs down the middle of the scanner’s lid, this is where the light source is that illuminates the negative as its being scanned from below.
On hitting preview I discovered that without Epson’s own negative carrier in use, the automatic thumbnail feature stops working reliably. So I had to simply select the relevant parts of the preview that I wanted scanned, apply the basic histogram corrections and hit scan once for each frame. This isn’t hugely onerous for medium format but would be a pain for 35mm using a 3rd party film holder.
It was clear straight away that there was a jump in image quality using the Digitaliza. After putting the resulting scans through an unsharp mask in Photoshop and then applying a little further sharpening in Lightroom I was gob smacked by the results. No it wasn’t as bitingly sharp as a DSLR scan can be, but it was 95% of the way there with better colour rendition, no photo stitching and better handling of shadow detail. Further experimentation led me to find the sweet spot for scanning is 3200dpi, which I downsample to produce 6000×6000 pixel 48bit (colour) or 16 bit (black and white) images.
Pro tip: the ‘lid’ of the Digitaliza pressed against the side of the scanner’s glass acts as a perfect spacer to line up the carrier just inside the transparency unit’s area.
Given the V600 has inferior optics to the V800, I suspect with a good negative carrier and similar post processing it would likely match a DSLR scan in quality — something I wouldn’t have believed possible given both the prevalence of lousy example scans I’ve seen around the Internet and the general consensus of sites like ScanDig and various long forum threads on the subject. I suppose it’s possible I’ve just been really lucky and have a particular good V600, but like the PlusTek too I think there are just a lot of people that don’t really know what they’re doing and blame their poor results on the hardware rather than their post processing choices.
Above you can see a direct comparison between a two shot stitch taken with my X-T2 and Tamron 90mm f2.8 1:1 macro lens (left) and the V600 (right). I’ve tried to match the processing as closely as possible but there are some inevitable differences in tonality and contrast. The stitched shot from the X-T2 also has some some slight distortion introduced because the camera wasn’t held perfectly parallel to the negative for both shots, hence the slight misalignment. Here’a a detail crop to let you better see the difference (or lack there of) in terms of overall sharpness. The X-T2 digitisation is on the left again, V600 on the right.
Workflow
In terms of processing my V600 scans, this is my workflow:
Scan in Epson Scan 2 into a folder that Lightroom watches for automatic import.
As soon as the photo pops into Lightroom I then use the Edit in Photoshop feature.
I crop any stray edges where I’ve exceeded the film frame and then resize the frame down to 6000×6000 pixels (assuming a 3200 dpi scan setting) using the Bicubic Sharper (reduction) setting.
Next I apply a prerecorded action that:
Uses the Camera Raw filter to apply colour noise correction at level 50. This removes any digital chroma noise introduced by the scanner’s CCD sensor but doesn’t affect the grain or detail of the photo. The Epson seems to produce fairly low noise output but I’ve found this step important on the PlusTek 8200 so I keep it in.
I will then spot any obvious dust out using a mixture of the Healing Brush, Clone Stamp and localised use of the Dust & Scratches filter that is great at removing dust specs from expanses of relatively low detail like skies and shadows.
I’ll hit save and the photo will update in Lightroom. I’ll apply a moderately strong sharpen of around 50~90 with a radius of 1.4 and detail of 25~50. Edit: I’ve also been experimenting with Photoshop’s Smart Sharpen feature, so if you don’t mind baking all the sharpening into the file, this also produces really nice results as an alternative step here.
I’ll make any other colour corrections, crops, etc that I feel the image needs.
Obviously there’s a degree of subjectivity in sharpening an image, but it seems like a lot of people tend to go a bit overboard with it. Looking at some of my earlier digitisations, it’s something I’ve definitely been guilty of myself to some degree. My rule of thumb now is to use the minimum you need to make things look crisp without it becoming a distraction. If someone’s first though on seeing your photo is “wow that’s sharp!” you’ve probably applied too much.
Closing Thoughts
As it is I can heartily recommend the V600 as a very good and affordable scanner for medium format film. I will try 35mm film in it to see how it compares to the PlusTek, but I suspect that without a better negative carrier it would be unacceptably soft for me. Still it’s fantastic news that there’s such a high quality, affordable scanner for medium format film. Even factoring in the cost of the Digitaliza, we’re talking well under £300. Compared to the faff and cost of building a really good DSLR digitisation setup, the Epson V600 either on its own or paired with a dedicated 35mm scanner, stacks up very favourably. I could have saved myself a few hundred pounds if I’d known this three years ago!
Addendum
After experimenting with scanning 35mm negatives in the supplied carrier, I have to say I can’t recommend the V600 for 35mm scans, I think even with the carrier held at perfect focus height the achievable resolution would only barely be acceptable. With the supplied carrier you couldn’t do anything practical with the images as you’re at best getting ~3 megapixels that will need massive amounts of sharpening to have any definition. Get that dedicated 35mm scanner and a good quality holder for 120 film!
DSLR scanning sucks. There I said it! Since my journey back into film photography started in 2017 I’ve been using my digital camera to digitise my negatives. It works, it can produce arguably great results – on a level with the very best quality you can achieve from a high end commercial scanner. But it’s a terrible solution.
Why is it terrible? Because it requires a shed ton of expensive gear to be done remotely well. Yeah you can just about cobble something together with any semi-recent digital camera, a macro extension tube and a nifty fifty (because proper 1:1 macros are expensive), you can sort of use a tripod, you can find a cheap LED light panel that produces whiteish light and so on. But this creates a really awkward setup, once the initial euphoria of “it works!” passes, you’re left with this really cumbersome and unreliable system that probably produces uneven sharpness and is a nightmare to align each time you set it up again. Oh and you’re on your own when it comes to turning your digitised negatives into positives.
The solutions to improving this setup are all really expensive – once you’ve added up the costs of a high quality 1:1 macro lens (£300-1000 depending on system), a proper sturdy copy stand (£200 or more), a high CRI light box (£50-100) and something to hold the negatives themselves flat (£30-300) you’ve easily spent £1000 or more. That puts you well into the ball park price of the highest end prosumer scanners like the Epson v850, the Plustek OpticFilm 120, the Reflecta MF5000 and so on.
For my DSLR* scanning I’ve tried a variety of things, starting off with the bodged solution outlined above. Trying, failing and trying again, replacing and tweaking each of the many components that make it up. Each step has cost more money and I’m incredibly fed up of it. To give a recent example, I’ve been unhappy with using my old Durst negative carrier as it cuts off about 4mm of the frame in each direction and its a faff to align the film well in it, especially at the ends of the strip. I’ve all but given up on ever receiving my Pixl-Latr so I bought both of Lomograph’s DigitaLIZA masks. The 120 model is excellent and works really well, the 35mm one on the other hand isn’t fit for purpose. So I’m back to the suboptimal Durst carrier again. At least I was able to resell the DigitaLIZA so I only ended up about £10 out of pocket, but still it’s frustrating.
* I use a Fuji X-T2 which is obviously a mirrorless camera, but for the sake of simplicity and brevity I’ll refer to it as a DSLR in this article.
So is the solution simply to buy a flatbed or dedicated film scanner?
Dedicated scanners also suck. Yeah, I know. Most scanners currently on the market are at best anywhere from 5 to 10 year old models. Sure periodically manufactures bump the model numbers, but the fundamental hardware is basically the same. A telling sign of this is that we’re still stuck with slow USB 2 connections, now a twenty year old standard that should feel as anachronistic as parallel and SCSI ports. Scanning speed is glacial – generally the fastest you can find is around a minute per 35mm frame and more typically you’re talking about several minutes per frame, so the process of digitising an entire 36 exposure role is likely to take an hour at a minimum. They also nearly all lie about their actual resolution (DPI) so it becomes a guessing game of what resolution you need to scan at and then downsample from to achieve the optimal result.
“A telling sign of this is that we’re still stuck with slow USB 2 connections, now a twenty year old standard that should feel as anachronistic as parallel and SCSI ports.”
However scanners do get some important things right, or at least they try to. Automatic dust removal, software designed to handle the whole process of capture, inversion and colour balancing, consistent results and quick setup. Some scanners even automate the process to the extent they can do whole strips or even multiple strips without supervision.
I enjoy editing my photos almost as much as taking them, but I do not overly enjoy the digitisation process itself so anything that makes that simpler and more reliable is a huge win for me. So I’ve decided to buy a dedicated film scanner, in the knowledge that it’s rebadged old hardware, that it will be slow and that I’m likely to encounter a learning curve to get the quality of results that I demand. In an ideal world I’d have been able to buy a scanner capable of handling 120 and 35mm film, but the only two choices there I can find on the market that produce adequate scan resolutions are both over £1000 and seem if not discontinued, then extremely scarce on the ground. So I’ve decided to keep my DSLR scanning setup for medium format for now, but switch my 35mm scanning to using a PlusTek 8200i. I’ll explain my thought process a bit below.
Why I chose the 8200i
I’ve been researching film scanners on and off for awhile now and have found there is precious little information out there on this subject despite the prevalence of YouTube channels and blogs dedicated to film photography. The only website with comprehensive scanner reviews I’ve found is ScanDig, which itself feels like a time capsule from the early 00’s. Reading their reviews you’ll quickly spot a theme – most of the scanners aren’t that good, they all over state their resolution to varying degrees and that they’re all generally worse than the long discontinued Nikon models. What they don’t provide is any full resolution sample scans or offer any head-to-head comparisons with a reference image for you to make your own mind up. At least they provide a good list of different scanners you can then look up individually on Google.
I quickly decided I wasn’t happy with the quality from flatbed scanners and it sounded like they nearly all had issues with accurately focusing on the negatives which resulted in extremely low resolution being achieved with 35mm, and only barely acceptable resolution from medium format. So next I turned to the dedicated film scanner market that thankfully is still limping along. The two main players here are currently Reflecta and PlusTek. Reflectas are also sold under a few different brands like Braun and Pacific Image.
“The Reflecta scanners seem to have a slight edge in terms of resolution, but are more expensive than equivalent PlusTek models.”
The Reflecta scanners seem to have a slight edge in terms of resolution, but are more expensive than equivalent PlusTek models. They also had very restrictive warranties until recently (up to 8000 scans) which makes me question the manufacturer’s expected longevity of their products given each photo will generally require at least 2 scans (preview and main), and potentially 3 with infrared dust removal. I also seemed to come across quite a few people complaining about technical problems with their Reflecta scanners, but that may just have been happenstance.
In the world of 35mm scanners they fall broadly into two camps; automatic and manual feed. If you’re sitting there with a huge box of negatives that all need scanning and you don’t have unlimited time and patience on your hands, then an automatic feed scanner is basically essential. You drop the negative into a carrier and it will work out where the frames are and scan each one for you. However for my needs, where in the worst case I maybe have two or three films to scan at any one time, manual feed is fine. As you might expect, manual feed scanners are cheaper. It also seems like one less thing to go wrong. PlusTek sell three manual feed 35mm scanners, the 8100, the 8200i SE and the 8200i AI. The 8100 is the cheapest and most basic model, it doesn’t do infrared dust removal – whether that’s important to you or not will depend on how much black and white you shoot (it only works on colour film). The 8200 models are identical except for the versions of the SilverFast 8 software they ship with.
First Impressions
The 8200i is a compact little unit and takes up considerably less space than any of the various DSLR scanning setups I’ve tried. It comes with a two film holders, one for mounted slides and one for a 6 exposure long negative strip (shorter strips can be used). I was a little apprehensive about the scanning software it comes with, SilverFast SE 8 Plus, as it has a reputation of having a steep learning curve. However it turned out it’s fairly easy to use – but I’ve been using professional level photographic software for over twenty years now so I’m not your average user.
The default scan setting uses 3600 dpi which produces roughly 19 megapixel images. This is definitely the sweet spot for useful detail from any film that’s ISO 100 or over unless you just want more defined grain. Scan times on my computer (3.6GHz i7 9700K, 32GB RAM) are around 55 seconds at 3600 dpi. A preview scan takes around 25 seconds. That time roughly doubles if you turn on the infrared dust spot removal as it has to do a second pass.
The 8200’s top resolution is 7200 dpi. At this resolution you’re not actually gaining that much more information, just inflating the size your file. Scanning at this resolution took 2:45 minutes on my machine. If you downsample this massive scan though you can extract slightly more detail than you get from the 3600 dpi scan so for certain special images it may be worth the hassle. It might also be useful if you need to do a lot of fine repair work on your negative before down sampling.
Resolution
Normal Scan
Scan + iSRD (infrared repair)
3600 dpi
55 seconds
1 minute, 40 seconds
7200 dpi
2 mins, 45 seconds
5 minutes, 50 seconds
Typical scanning times with and without infrared dust and scratch repair on a high spec desktop PC.
SilverFast has lots of modules you can add to your work flow for sharpening, grain and noise removal, auto-contrast and so on. I’m not using any of them – I want my scans to be relatively neutral because I will be post-processing them in Lightroom and Photoshop. I’m not really convinced any of them hold a candle to what you can achieve in Adobe’s apps either. Take the infrared dust and scratch removal feature – it does a fairly decent job of spotting the blemishes on your film, but the actual corrections it applies are ham fisted compared to what you can achieve in a few minutes with the dust and scratches filter in Photoshop (applied locally) and the clone stamp or healing brush. It’s fine for dust specs, but if you have scratches or damage to the emulsion it will do more harm than good.
What SilverFast does do a very good job at is converting colour negatives into positives. It has an extensive range of presets for all the common films from Kodak and Fuji, including many long discontinued ones from other brands. It is however missing anything that’s come out in the last few years like CineStill or Lomography films and surprisingly also Kodak’s ColorPlus. However you can easily switch profiles without needing to rescan to see how the colours change, so it’s just a case of choosing something that looks pleasing.
For black and white films the profiles tend to mess with the contrast and sometimes introduce a slight warming or cooling effect. I just look for which ever is neutral enough – I don’t want to bake a load of contract into my scans. Unless you scan your black and white images in colour mode you’re unfortunately limiting yourself to 8 bit output (that is only 256 shades of grey) which feels a bit unforgivable in a piece of software as mature and expensive as SilverFast.
When it comes to fine tuning your scans the first port of call should ideally be Photoshop (or a similar tool). You can fix any obvious blemishes and then a little colour noise reduction will leave your image looking pretty nice if still a little soft at the pixel level. Applying a moderate level unsharp mask (say around 100% with a radius of 0.9 and threshold of 2) and your image should begin to look pretty crisp, but not over sharpened. It’s at this stage that I import the photo into Lightroom for any colour correction or further sharpening. You could skip the Photoshop step and go directly to Lightroom, but I find Photoshop faster for dust spotting.
So how does the 8200i compare to my DSLR setup?
So far I’ve found the 8200i compares favourably to the best scans I’ve managed to make with my DSLR and macro lens. In terms of raw detail, when the macro lens is perfectly focused the results look as good as the 7200 dpi scans downsampled to around 24 megapixels (the native output of my DSLR). But where the scanner excels is that it’s always properly focused, something that is not easy to achieve with a manual focus macro lens like the one I use. So that means the regular 3600 dpi scans look as a good as or better than my typical results with the DSLR. I’ve found this especially true for slide film. I thought slide film just wasn’t that sharp – turns out I was wrong, I just could never focus on it properly!
Here’s a shot on new Kodak Ektachrome
Top right, DSLR capture. Note the mushy green foliage with very little fine detail. This is already a weak spot of my Fuji X-T2’s X-Trans sensor, but even non-green areas are this lacking in detail and I tried refocusing on the slide several times.
Bottom right, 8200i scan. The fine detail of the leaves in the distant trees here really surprised me – I just didn’t think ISO 100 slide film could resolve that much detail!
100% crop from DSLR scan100% crop from 8200i scan
SilverFast also does a hands down better job at creating pleasing and balanced colours from colour negatives than I’ve ever been able to achieve myself. I’ve always found correcting for the orange mask kills my reds leaving them looking more orange and washed out than they should be. Films which I thought looked a bit washed out because of my low temperature home processing are suddenly bursting with vibrant colours, it’s a total revelation!
DSLR scan with colour correction in Lightroom
PlusTek 8200i scan with colour correction in SilverFast
So in terms of raw image quality and colours I’m honestly thrilled, it’s a marked improvement over what I had. I have discovered some downsides though. The first is that SilverFast can only output 8 bit per channel tiff files*, that somewhat limits your headroom for pushing and pulling highlights and shadows. It’s especially egregious for greyscale files where you are dealing with only one 8 bit channel. To get true 16 bit output you have to spend a fortune on Silverfast Ai Studio which is an expensive upgrade for such a basic feature.
“So in terms of raw image quality and colours I’m honestly thrilled, it’s a marked improvement over what I had.”
* it can also output to its own proprietary HDR raw files which do offer 16 bits per channel but which of course require an expensive dedicated piece of software from Silverfast to work with 🙄.
I decided to try rival scanner software VueScan to get 16 bit greyscale output and it works fine, however it seems to produce a little bit of banding that I don’t see with Silverfast, although it only effects the extreme edge of the scan so I can crop it off easily enough and only lose around 20 pixels. I don’t find VueScan’s colour output especially good however, I’m sure with enough patience and trial and error you can make it good, but in this regard Silverfast is hands down better as it works out of the box.
The second major downside is that it turns out scanners can ‘see’ damage to the surface of a negative that my DSLR could not. I’ve never mistreated my negatives, I keep them all in glassine sleeves and I don’t squeegee them when drying. However I still seem to have scratched a lot of them, I can only assume during my previous digitisations pulling them through the negative carrier. I’ve not come across anything that was especially hard to fix in Photoshop, but if you’re going to be dealing with less well treated films then this is something to keep in mind. As I mentioned above the automatic dust and scratch removal is limited and it’s particularly poor at correcting scratches turning them into coloured gashes that clearly disrupt the grain pattern and any other fine detail they pass through.
So I should buy a film scanner?
If you’re totally happy with whatever setup you have at the moment and that doesn’t already involve a film scanner, then obviously no. However if you’re at all unhappy with the faff, the colours, the sharpness or whatever and you primarily want to scan 35mm then yeah, you really should invest in a dedicated scanner because the results are that much better. I wish there was an equally good and affordable solution for medium format. Maybe an Epson v850 is a good enough as a stop gap, but I hope either PlusTek or Reflecta will step up here and refresh their offerings for the new generation of film shooters.
The C35 was an entry level colour 35mm enlarger made by Italian firm Durst in the early 1980s. It had a sister model called the C65 (yes65) that was designed for up to 6×6 negatives. The only difference between the two models was the supplied mixing box, negative carrier and lens, they otherwise shared all the same components. From my searching it seems like the C65 is rather rare, especially compared to the C35 which can be easily found on eBay or at specialist photography stores that carry secondhand kit, usually for around £50 or less.
Upgrading to an LED light source
The main weakness of the C35 (and C65) is the light source. They were originally designed to be used with a 55W reflector bulb. When paired with the mixing box diffusor this was decidedly dim compared to an enlarger using a condensing lens. Luckily the lamp fitting takes a standard E27 Edison screw mains voltage bulb, so we can bring things into the 21st century by fitting a much brighter LED bulb.
I recommend the Philips Corepro LED bulbs, you’ll want a cool white version because photographic paper reacts primarily to blue light. Don’t cheap out on the bulb as you want something that will emit an even and wide spectrum of light.
Philips Corepro LED bulb with diffuser removed.
To level up the light bulb even more for our purposes I recommend (carefully) removing the opal diffuser from the bulb itself. This means more of the light will go directly into the mixing box instead of bouncing around in the lamp housing. On the Corepro bulbs this is simply held in place with adhesive and can be pried loose with a flat head screw driver without too much difficulty. Obviously don’t do this while it’s plugged in or turned on and don’t touch the exposed LEDs or you risk electric shock! Once installed in the enlarger the bulb will be safely behind a glass heat shield.
Note that I’ve only tried black and white multigrade printing with an LED bulb, I can’t guarantee you’ll get great colour results using one; but then if you’re serious about colour printing the C35 isn’t a good option anyway given the lack of a proper cyan filteror voltage regulator.
Upgrading the Lens
The C35 comes with a fairly basic, plasticky 50mm f2.8 lens Durst brands as a Neotaron. Mine was full of fungus and refused all attempts at disassembly so I was unable to clean it. The C35’s lens board will take any Leica M39 screw mount lens so you have plenty of upgrade options.
Durst also made a very nice premium 50mm f2.8 lens with the Neonon name. This is an excellent quality lens that generally sells for a lot less than other popular enlarging lenses from the big brands. If you’re looking for a 50mm lens for your C35 this is what I’d recommend.
Note that due to the maximum column height of the C35 you won’t be able to make much more than a 9.5×12″ print with a 50mm lens. If you want to print bigger you either need to find a wide angle 40mm lens or rotate the column on the enlarger so it projects on to the floor. Sadly you can’t rotate the enlarger head to project on to a wall.
If you have a C65 or an upgraded C35 that can handle 6×6 negatives, you’ll also need a 75 or 80mm lens. Durst made a fairly dark 75mm f4.5 lens, but I’d recommend looking for something a little brighter. I have an inexpensive Meopta 80mm f4 that came bundled with my old Gnome enlarger. Unfortunately it’s too big to use the C35’s swing in red filter, but that’s not the end of the world.
Upgrading the C35 to handle 6×6 negatives
The incredibly rare Durst MEKIT 65 6×6 upgrade kit for the C35
As I mentioned at the start of the post, the only differences between the C35 and C65 are the negative carrier, mixing box and lens. So it stands to reason you can simply upgrade by swapping these components. Indeed Durst sold a kit called the MEKIT 65 for just this purpose. Unfortunately despite how common the C35 itself is, these kits are exceptionally rare*. So this part of the guide will probably only be helpful to a small number of people, but given the absence of any real information about it online I thought I’d try and fill the void.
* Another source of these components (other than the kit) might be a broken C65 – as long as you have at least the negative carrier and intact mixing box you should be in business.
I was extremely lucky and did manage to find a MEKIT 65 the other week by chance, albeit missing the 75mm f4.5 lens. As mentioned above I already own a Meopta 80mm lens so this wasn’t an issue.
However it wasn’t until after ordering I noticed a problem when examining pictures of the kit – on my C35 the magenta and yellow filters are integral to the mixing box, but the MEKIT 65 seems designed for a version of the C35 where this is instead fixed to the lamp housing. Oh dear!
So it turns out there are two versions of the C35, my one that is presumably a late model, whose main differentiating feature seems to be illuminated scales on the mixing box and the original which didn’t have this. The illuminated scale model for some reason moved the yellow and magenta filters to the mixing box itself, where as on the older model this was on the lamp housing.
From the manual, MESIXKIT 65 vs MEKIT 65
Checking the manual that came with my C35 it still talks about the enlarger being upgradable but makes no mention of the MEKIT 65 and instead mentions MESIXKIT 65. Searching for MESIXKIT 65 turned up nothing of use.
After further inspecting both my mixing box and pictures of the MEKIT 65 one, I became convinced it would be possible to retrofit the colour filters to it as the overall design of the box itself was largely unchanged. Today I put that to the test as the upgrade kit was delivered!
The MEKIT 65‘s 6×6 mixing box on the left with my ‘new style’ 35mm box on the right (the apparent size difference is due to the added height of the colour filters on the back).
It was straight forward to remove both the metal plate from the 6×6 mixing box and the colour mixer from the 35mm mixing box. They both attach in the same manner at the top of the box with two little hooks that clip into the plastic, but they are screwed into slightly different locations at the bottom.
Mixing boxes with the backs removed, MEKIT 65 on the left again.
Interestingly there are indents where the screws should go on the 6×6 version of the box, presumably that isn’t a coincidence! I removed the black card baffles and swapped the metal filter holder over from the 35mm mixing box. It fit perfectly so that was a good sign (the 35mm box still has a 6×6 aperture where it meets the lamp housing).
Next up I tried to fit the colour filter plate and thankfully it simply slotted into place. The metal plate from the 6×6 mixing box would not fit the 35mm box however – although that’s not a concern here, it does mean you might have difficulty if you were trying to fit a MESIXKIT 65 to an older style C35 for some reason.
The 6×6 mixing box with colour filters attached but not yet screwed in.
Now it was just a case of screwing the colour filter plate into the 6×6 mixing box. First I removed the diffuser from the bottom of the box to make sure I wouldn’t be damaging anything with the screws (and to give it a clean). There was just an empty void where the screws were going so I had nothing to worry about. The plastic is fairly soft and it wasn’t hard to drive the screws from the 35mm mixing box into it without risking cracks.
Checking the area the screws would be tapped into.
After getting the screws in, I blew out any remaining dust with a blower, gave both sides of the diffuser box a gentle clean and then screwed that back in place.
The assembled MEKIT mixing box with colour filters.
The final step then was to simply affix the mixing box with colour filters back to the enlarger. This is super easy as there are four fixed bolts on the back of the colour filter plate that correspond with holes on the lamp housing, then it’s just a case of tightening 4 plastic nuts to lock it into position.
So that’s how you fully upgrade your Durst C35 to handle both 35mm and 6×6 negatives, at least if you end up with a mismatched enlarger and upgrade kit! Knowing now that there are multiple versions of the C35, if I were buying one today I’d look for the older model as it would be easier to upgrade and the illuminated scales are really not worth the extra hassle.
One of the benefits of being in a camera club full of largely retired people who were all into photography long before digital was ever a thing, is that lots of them have old film, paper and gear lying around they’re happy to give away.
Last year I was offered a photographic enlarger for making prints, but I initially turned it down because I didn’t think I’d have the space to set up a darkroom and use it. Well, turns out with a little imagination our windowless bathroom actually converts into a pretty tidy darkroom with fairly minimal setup and teardown – thankfully we also have an ensuite so my partner can cope with this arrangement with only minimal grumbling
So I took possession of an old Gnome enlarger of 1950-60s vintage, from Alan at the camera club. I bought some trays for the various chemical baths and was given an enlarging easel, safe light, focus finder and some 5×7″ Multigrade paper to play with.
The printing process is very simple, but has quite a few steps that you have to work through methodically. Basically you need to put a negative into the enlarger, focus that at whatever size you want to print it, do a test run with a strip of paper that you expose incrementally to the projected light to determine the optimal exposure time, then repeat the process with that exposure time for a full sheet of paper.
Working with my Gnome Rangefinder enlarger.
The process of actually developing black and white photographic paper is identical to that of processing black and white film. That is a three step process of moving the exposed paper between a developer bath, a stop bath and a fixer bath. Paper development is fast, taking just a minute to develop, about 10 seconds to stop and another minute to fix. Then just a couple of minutes of washing and you have a print ready to dry. Unlike normal film, photographic paper isn’t sensitive to red light so you can safely do all this under the dim red glow of a safe light to see what you’re doing.
When it comes to printing there are two basic paper types, resin coated and fibre. These come in various finishes from full gloss to matt. Resin coated is the easiest to work with (and all that I’ve used so far). It dries quickly and doesn’t wrinkle. Fibre based paper is more like regular paper with a photographic emulsion coated on to it and it requires significantly longer to wash and dry. Also care has to be taken to flatten it out as it wrinkles easily when drying. Fibre paper is generally regarded as offering a nicer finish than resin so it’s something I will have to try sooner or later.
Since my initial forays on 5×7″ paper I’ve been given a variety of larger sizes from 8×10″ to 12×16″. My trays only fit up to 9.5×12″ paper and I can’t reasonably fit larger ones into the bathroom, but I’ve now acquired a cheap drum for doing up to 12×16″ paper on my Jobo rotary processor that I usually use for film development. Once paper is loaded into the drum it can also be processed in full daylight as it has a light trap allowing chemicals to be poured in and out without exposing the paper.
A recent print made on my Durst C35 on 8×10″ paper.
A few months ago I was able to upgrade my enlarger to a Durst C35 from the early 1980s. It’s considerably smaller and easier to handle than the rather cumbersome Gnome. Retrofitted with a modern bright LED bulb it also probably works better now than it ever did with a dim, hot 55W incandescent in it. The one downside of the C35 is that it lost me the ability to print medium format negatives, but that’s something I hope to rectify soon as I’ve finally sourced one of the incredibly rare upgrade kits for it.
I’m continuing to enjoy my analogue journey as you can probably tell, and darkroom printing is a fun and rewarding addition to that. It’s interesting to learn new techniques like dodging and burning, split grading to control contrast, adding borders and so on. It’s a cliché of course, but it really is a magical process. There’s more than a century of accumulated knowledge and science behind it, but the hands on nature of the process and your ability to play with it anyway you want, is a long way removed from the relentlessly automated, digital world we’ve created for ourselves.
If you’d like to see more of my darkroom prints take a peek at my Etsy store! They are of course genuinely hand made and each one is unique thanks to the analogue process.
Where better to spend the day after the coldest night of the winter, than a derelict mansion riddled with broken windows, standing around behind a camera? Well that’s how I spent the 3rd of February – at Woolton Hall, a once grand, but now semi-derelict mansion on the outskirts of Liverpool. The event, organised by photographer John Ayliffe, brought together a number of photographers, models and makeup artists. I officially went as an assistant to my friend Rob Lycett and helped him lug his gear to the second floor and with lighting models.
I’ve been keen to try shooting my film cameras with studio lighting and this was the perfect opportunity to try it out. I went with my Bronica SQ-Ai medium format camera and my Vivitar v335 35mm SLR to shoot with my Pentax glass. (I’d have loved to use my Pentax MX, but didn’t want to be restricted to its meagre 1/60 flash sync speed).
Model: Rob Ancomy
The Bronica was loaded with good old HP5+ and owing to a sudden parting of the clouds, was mostly shot with natural light as it was just do damn gorgeous in the room we were in. The Vivitar on the other hand had the sublime Kodak Portra 160 loaded in it and was used extensively with Rob’s studio lighting setup. The light setup most used was a giant softbox on a boom to provide fill light and a gridded (or in some cases bare) speed light to add rim lighting or more directional hard lighting. We also made good use of a large reflector, both in the naturally lit shots and the strobe ones.
The models were all very professional and took the freezing conditions in their stride – helped by a copious number of hot water bottles and some time basking by infrared heaters, in the one part of the mansion where the electric still worked, between shoots.
Overall it was a great experience and something I hope to do again, albeit preferably in warmer conditions next time!
You might imagine that it’s hard to get hold of film and analogue photography equipment now in the late twenty teens, but fear not! There are actually a growing number of businesses specialising in film photography. To make life easier for people just getting back into film I thought I’d compile a list of businesses I’ve come across while on my analogue journey. This is not an exhaustive list by any means, but should give you a solid starting point.
Location: Guernsey, Channel Islands Pros: Excellent prices on film – 5 packs of 120 generally £5-6 cheaper than elsewhere. Good range of Fuji and Kodak films. Bulk discounts. Cons: Only Fuji, Kodak and Ilford films, no chemistry, cameras or lenses. Ilford film prices no cheaper than anywhere else. Other services: No. Shop you can visit: No.
Location: Birmingham, England Pros: Great selection of films, darkroom papers, chemicals and processing equipment. Excellent prices on Ilford films – FP4 and HP5 120 rolls and 24 exposure 35mm films under a fiver. Discounted 10 packs of Ilford film. Cons: Very limited selection of camera equipment. Prices on Kodak film not great. Separate website for ordering film processing. Other services: Full range of development, scanning and printing options here. Darkroom workshops. Shop you can visit: Yes
Location: Amersham, England Pros: Massive selection of fresh film including many obscure and new brands. Every imaginable format. Sample shots for each film. Now carry developing chemistry, analogue merch and more. Cons: Many of the more interesting items tend to go out of stock quickly. Prices are fairly good, but multipacks can be found much more cheaply elsewhere. Other services: No. Shop you can visit: No.
Location: London, England Pros: Good place to look for high end film cameras like Leicas, Rolleis, Contaxes, Hasselblads etc. They also carry a lot of Nikon film bodies and lenses. Cons: They don’t sell cheap cameras and it can be hard to spot things without four figure price tags – but they are there if you look hard enough! You can’t order online and have to rely on them keeping the stock list on their website up-to-date. Other services: Camera repair and film processing. Shop you can visit: Yes
Location: Birmingham, England Pros: Good range of second hand darkroom equipment, often at competitive prices. Lots of inexpensive low-end film cameras. Cons: Website can be a pain to navigate unless you search for specific items. Tend not to have much mid-range or high end gear. Other services: Offer gear rental and part exchange. Shop you can visit: No
Location: Leeds, England Pros: Small selection of second hand film cameras and films. Helpful and knowledgable staff. Good prices on Ilford film. Selection of Ilford papers and darkroom chemistry. Cons: Very limited film camera and lens selection. Other services: Repair service. Shop you can visit: Yes
Location: Inverness, Scotland Pros: Great selection of second hand analogue equipment, fair prices. Excellent prices on Ilford film with discounted 10 packs. They now carry B&W film chemicals and Kodak film. Cons: Second hand camera stock tends to be limited to less desirable or very expensive models. Other services: No. Shop you can visit: Yes
Location: Taunton, England Pros: Huge selection of new photography equipment with a great selection of film, darkroom papers and chemistry. Occasional very good deals on expired/short dated film and darkroom supplies. Good range of Jobo tanks, processors and accessories. Cons: No secondhand equipment. Several times I’ve ordered from them and have had films substituted without warning. Other Services: Digital to film transfer (yes you read that right). Shop you can visit: No
Location: Rickmansworth, England Pros: Specialises in medium format Bronica, Mamiya and Fuji studio cameras and accessories. Good range of obscure accessories. Fair prices with small discount for paying by bank transfer. Cons: Very limited selection of complete camera systems, this store is best for accessories and lenses. Doesn’t seem to list new items that often. Other services: ECN2 processing. Shop you visit: No, but does allow collections.
Location: Mobberley, England Pros: Everything Ilford makes direct from the source. Cons: Unfortunately you can find everything cheaper elsewhere. The price differences aren’t massive but will add up if you’re making a big order. Other services: They have a separate photo processing service called Harman Lab. Shop you can visit: No
Janet Green Photographic
Location: Halifax, England Pros: Fair selection of films and a window full of secondhand cameras. Very attractive prices on some of their second hand camera gear! Cons: No website. Film prices higher than you’d pay online. Other services: Photo printing. Not sure if they offer development. Shop you can visit: Yes
Location: Folkestone, England Pros: Good selection of films including bulk rolls. Sell 127 and 620 film! Good range of chemistry and darkroom supplies. Cons: Limited selection of secondhand cameras. Items often out of stock. Other services: Full range of development (C-41, E6, B&W, ECN2), printing and scanning services. Shop you can visit: Yes
Location: London, England Pros: Good selection of films including some rarer emulsions like Fuji Industrial and JCH StreetPan. Sell single rolls of films that usual only come in multipacks. Bulk rolls of Foma films. Fair selection of chemistry (including for alternative processes) and processing equipment. Nice selection of premium photo books and zines. Good selection of darkroom papers. Cons: Their film prices are slightly higher than you can find elsewhere. At any one time quite a few things tends to be listed as out of stock. Other services: No. Shop you can visit: Yes.
Location: Manchester, England. Pros: Great selection of second hand film cameras and lenses. Nice new website and also an eBay store. Cons: Limited selection of cameras online, tend to be more premium end (Rolleiflexes, Leicas and Hasselblads). Limited selection of film in store. Other services: Offer camera repairs. Shop you can visit: Yes
Location: Midway between Cheltenham & Oxford, England Pros: Great selection of darkroom equipment, mostly used but also some new. Fair selection of cameras and lenses. Ilford film, papers and chemistry. Good prices for Ilford film. Cons: Some of their camera and lens prices are ridiculously expensive (although this isn’t universally the case). Clunky website. Other services: No.
Shop you can visit: Yes
Location: Poole, England Pros: Good selection of film at very reasonable prices (24 exposure rolls of FP4 and HP5 for less than £4!). Good selection of European films like Adox, Rollei and Agfa. Very good selection of B&W and colour chemistry, including in individual C-41 components. Also stock chemistry for alternative processes. Good array of darkroom bits and bobs, paper etc. Good prices on Jobo 1500 series development tanks. Cons: Film cameras limited to disposables and pinholes, no secondhand stock. Other services: No. Shop you can visit: No
Location: Bordon, England Pros: Good selection of films, including Bergger and Adox as well as the usual Kodak, Ilford and Fuji ones. Excellent prices on Ilford film. Broad selection of chemistry for B&W, colour and alternative processes. Good array of darkroom equipment and paper. £4.99 next day delivery. Cons: Kodak and Fuji film prices nothing to write home about, although they do have Portra 160 120 5 packs for under £30. No secondhand film cameras or lenses. Other services: No Shop you can visit: Yes – warehouse.
Location: Leeds, England Pros: Great selection of second hand cameras and lenses. Fair selection of film. 3 month warranty on second hand equipment. Often have a few rolls of expired film for grabs fairly cheaply. Small selection of Ilford chemistry. Cons: Film and chemistry only available in store. Other services: Offers film development via a 3rd party service. Shop you can visit: Yes
German based MacoDirect sell a huge range of films and analogue photography equipment. They’re also responsible for the Rollei branded line of products, including films and darkroom papers. Take advantage of your ability to easily import things from the EU while you still can 😦
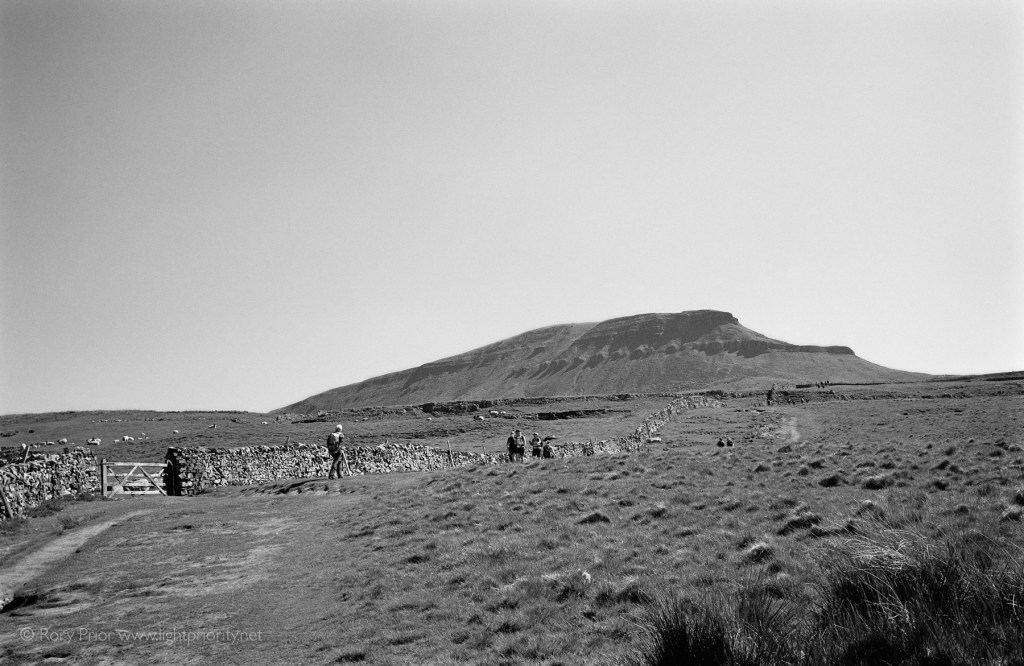
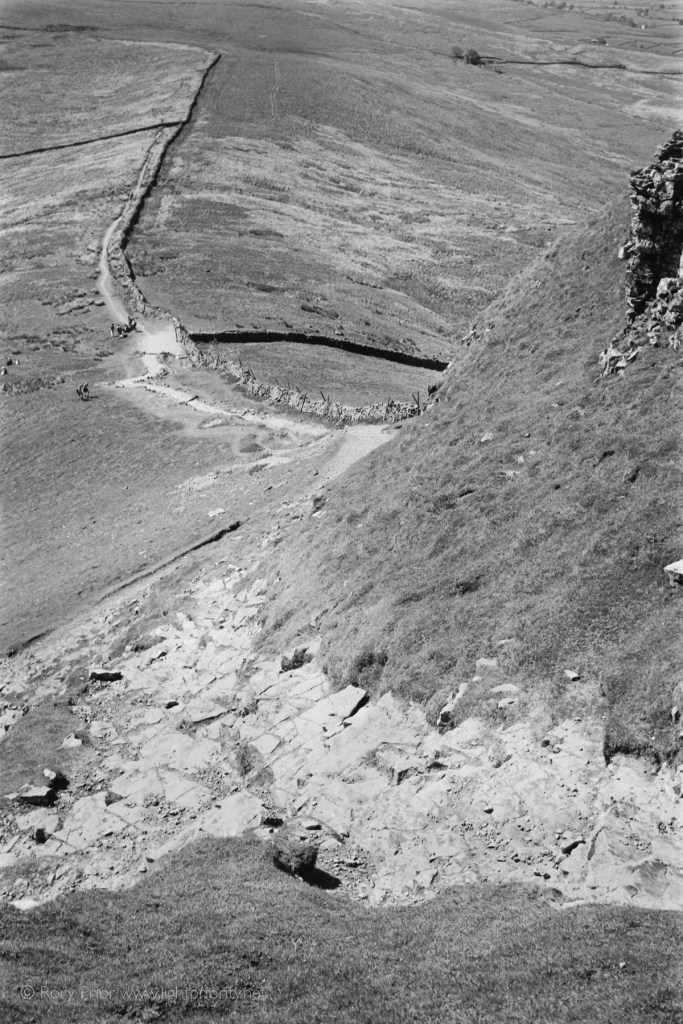
Back in May my partner convinced me to go climb Pen-y-ghent with him, one of the Yorkshire Three Peaks. At 694m, or 2,277 feet, it’s not the tallest mountain but it’s still a fair challenge, and the total hike which took us from Horton in Ribblesdale to Ribblehead was on the order of 12-13 miles. I took two film cameras to document the trip, my Rollei 35 SE loaded with Fuji Neopan Acros 100 and my Rolleicord Vb loaded with a roll of Provia 100F. I had the 16 exposure kit in my Rolleicord as I wanted to maximise the number of shots I had. I didn’t break out the Rolleicord until after climbing to the top of the mountain so all the shots in colour are from the decent.
The path was pretty gentle to begin with and we joined a fairly steady flow of walkers, setting off at about 10 in the morning.
The path got gradually more rocky and uneven as we neared the foot of the mountain.
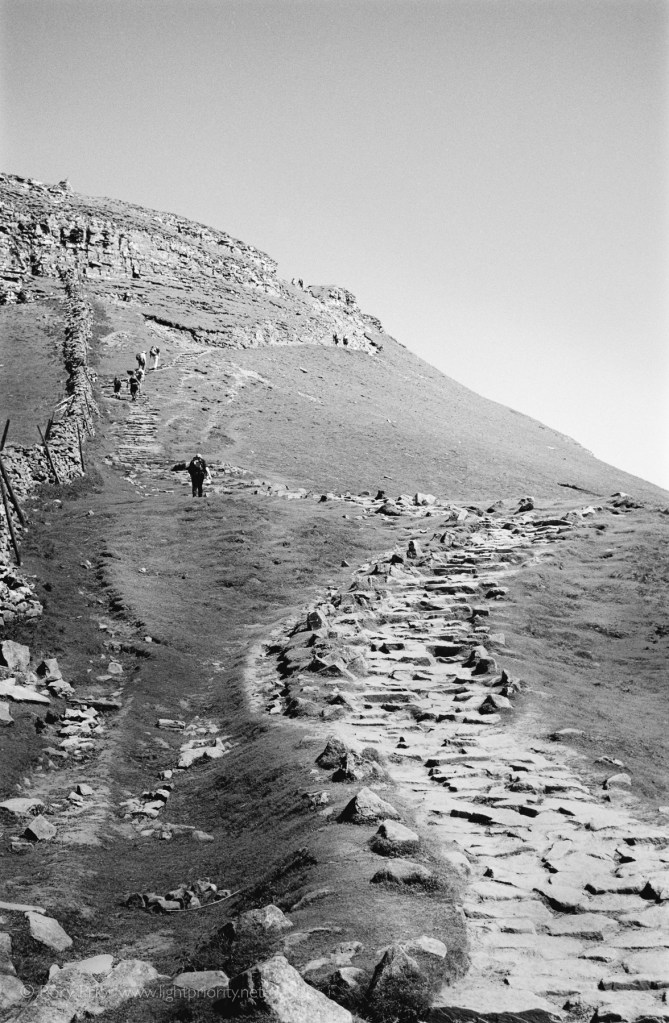
The path gradually gave way to a stony steps. As the route is so well walked these stone paths are essential to prevent the terrain from getting eroded into gullies.
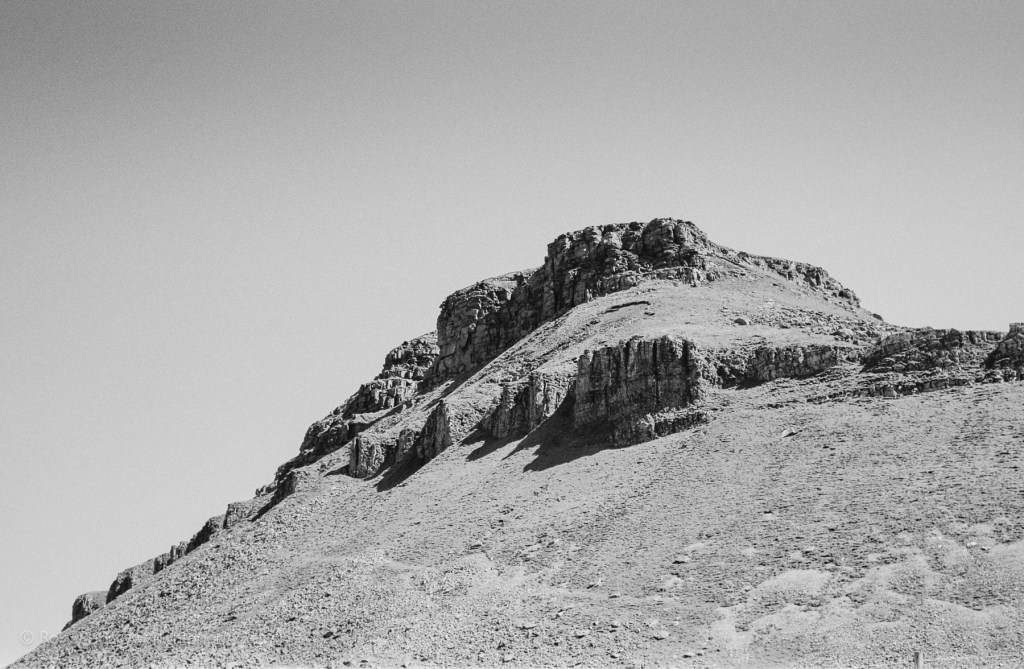
Looking up towards one of the peaks with the scree slopes beneath. There are a few points where some mild scrambling and rock climbing are required to reach the summit from this side, but it’s all pretty tame really.
Getting near the top the views are already looking pretty spectacular with clear views for a good few miles before the haze sets in. Being a national park, there are no pylons or big roads to mar the landscape.
Looking back at the long way down the mountain side.
On reaching the summit we waited our turn to get a selfie by the OS trig post. I forgot to get a shot on film so this is from my iPhone, looking back at the path we’ve just climbed up. Now with the hard bit done it was time to breakout the Rolleicord and get some colour shots.
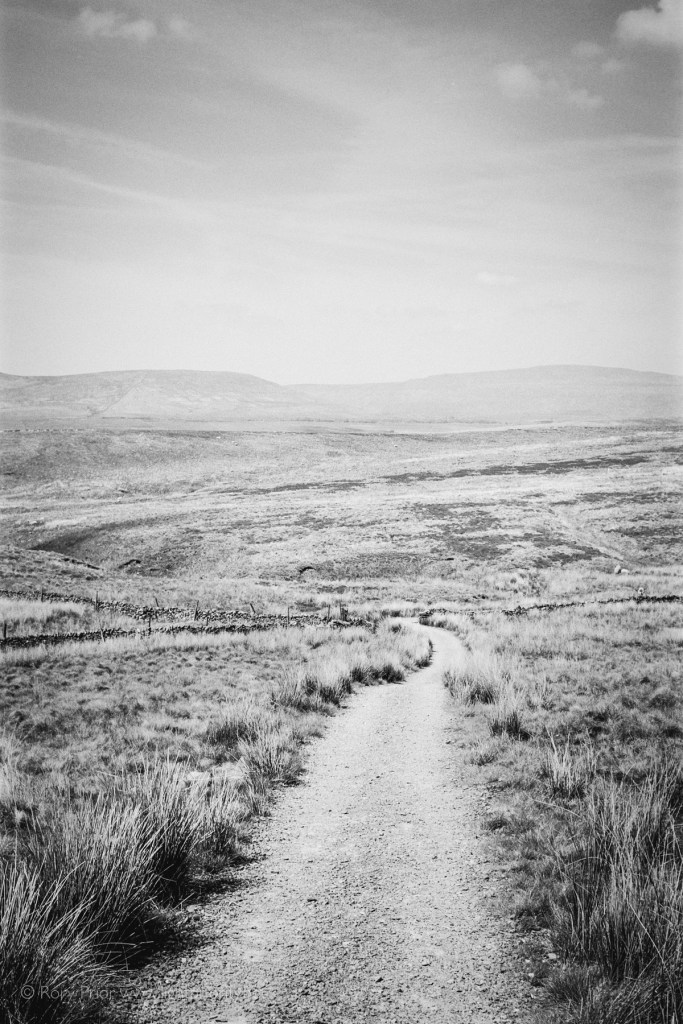
The previously clear blue skies started to get a few clouds as we began our decent on the opposite side of the mountain. The path on this side is largely made of big stone steps.
You can just make out the white line of the path we’ll be walking, snaking off into the distance. You can even just make out the Ribblehead Viaduct over the cloud shadow on the mid-righthand edge.
Looking back over my shoulder I could see the peak of Pen-y-ghent slowly receding.
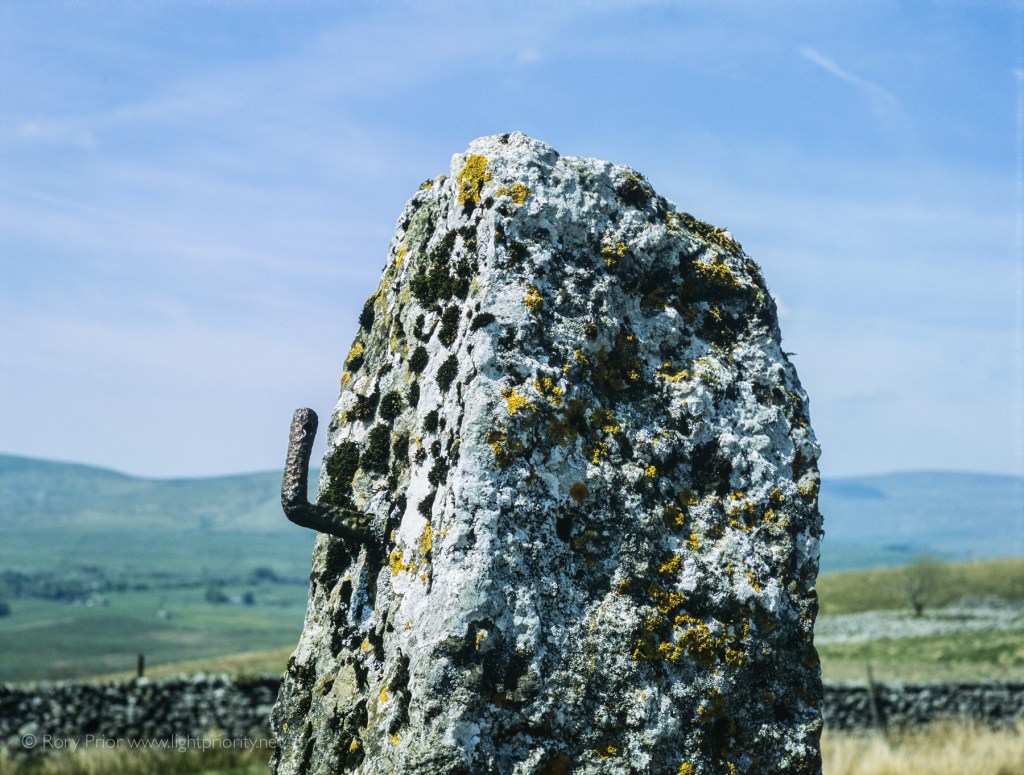
Every structure was encrusted with a mix of moss and lichens, as seen here on this old gate post.
I used a yellow filter on the Rollei 35 which helped brighten the path and some of the moorland reeds and grasses.
Towards the end of the hike, the footpath took us through a farm yard. Look at the date above the door of this farmhouse – that building has stood there since 1681!
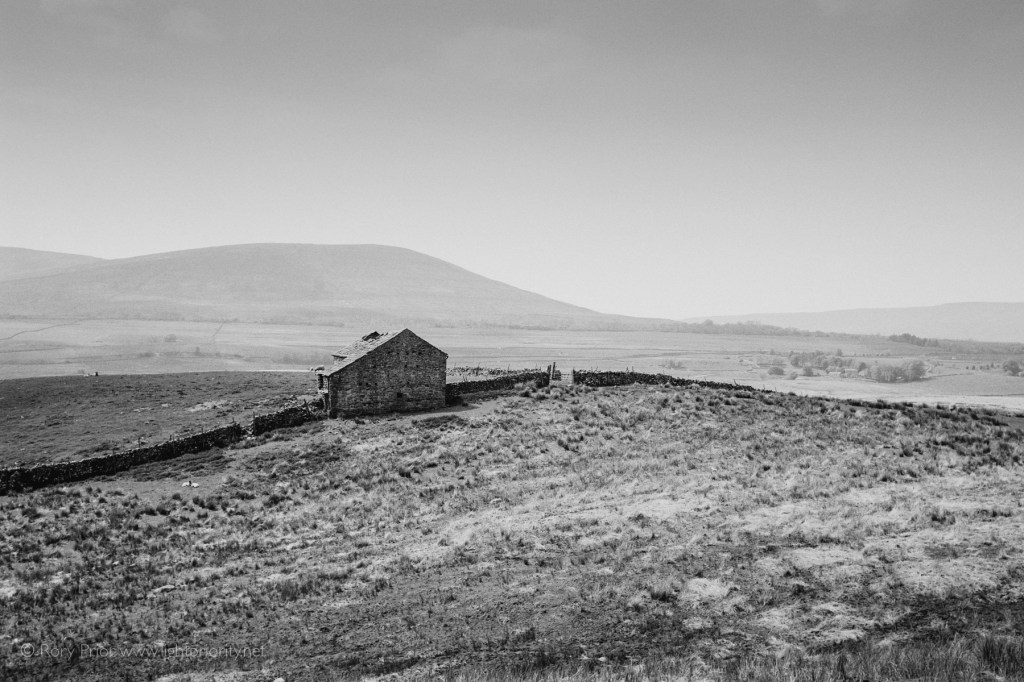
With the exception of the ever present winding drystone walls, the land is pretty bare. This ruined barn sits in rather splendid isolation.
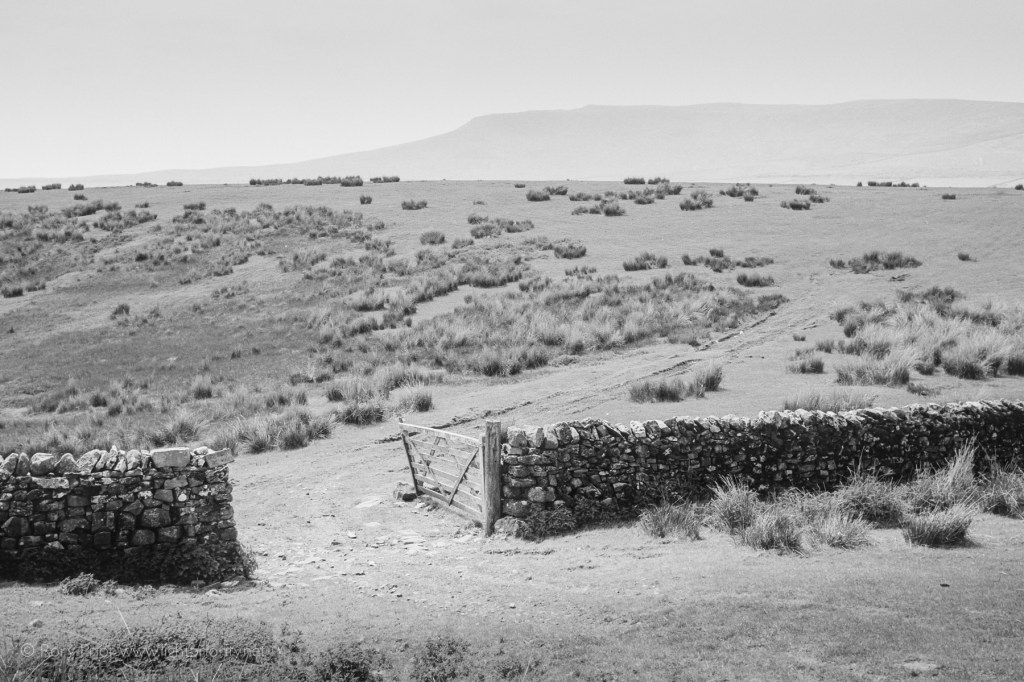
We encountered a lot fewer walkers on the far side, you can just start to make out some of the cool limestone pavements the area is known for in the distance in this shot.
I’d love to come back here when I can spend a bit more time to explore and photograph the limestone pavement.
The background haze gradually increased as the afternoon wore on.
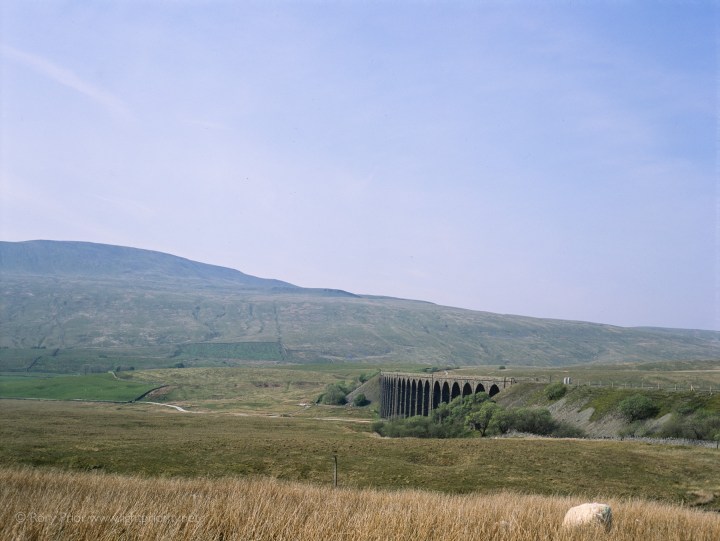
Ribblehead Viaduct
The last stretch of the walk ran along the road to Ribblehead and as it wasn’t very visually interesting, this part of the hike really felt like it dragged out. When the amazing Ribblehead Viaduct finally came into view though it was all worth it. Unfortunately to get a good shot of the viaduct would have required a fair bit more hiking down into the valley it crosses – something neither of us had the energy to do at that point. So instead after having some refreshments at the fairly mediocre Station Inn pub, I quickly ran up the road to get this view from behind the viaduct before we had to dash off to catch the train home. The trains only stop every 2 hours at Ribblehead so we were keen not to miss it.
So last November the Reflex camera was launched to much fan fair on Kickstarter. The aim was noble, to produce a new 35mm film SLR with a bunch of innovative features. Riding the resurgent interest in film photography, the campaign quickly surpassed its funding goal raising over £131K. A very impressive feat and a real vote of confidence in the future of analogue photography. I too backed the project, albeit only for £5, as I was dubious at the time they’d ever ship their ambitious camera design, but wanted to chip in anyway.
Come July of 2018 and I finally got my reward for that £5, a tote bag. Delivered an impressive 7 months later than promised. Now Kickstarter is rather infamous for projects missing their delivery dates by sometimes ridiculous margins, but I fear my tote bag example, where an off the shelf product that simply needed to be branded and posted out taking half a year longer than promised, is rather indicative of what is likely to be a very rocky and potentially disappointing outcome for Reflex’s more enthusiastic backers.
My concern from the get-go with Reflex was that it was far too overly ambitious for a first attempt at making a camera by a team of inexperienced people. Interchangeable lens mounts, bluetooth smartphone connectivity, swappable film backs, flash and constant lights. It all sounds great, but maybe pick one of those things and make a functioning camera that can be mass produced and sold for the optimistic price of £350 and then start worrying about those other features. Trying to achieve it all from day one is a recipe for, well… failure, because I guarantee you they will drop one or more of those features or the camera will never see the light of day.
One of the main problems they are going to face will be manufacturing tolerances – well after actually finding manufacturers in the first place. You see for every deviation you make from a camera simply being a light proof box with a single hole to let in light to expose a film/sensor, you increase your complexity and chances of failure by a huge margin. If you’ve ever shot any analogue camera you’ll know light leaks can be a real problem if things have gone even slightly out of alignment, especially in a modular camera as there are multiple interfaces that must be kept perfectly aligned and sealed.
The Reflex camera introduces multiple points where light leaks can occur due to its interchangeable backs and lens mounts. It only takes one of these parts to vary slightly from spec for problems to potentially occur – and remember these things are going to be stamped out at some factory in China, not hand crafted by artisans with decades of experience in building analogue cameras in Japan, Germany or Switzerland, like most of the treasured film SLRs of yore. Even if you can avoid light leaks, any slight give between the back, body and mount that moves the focal plane and lens from being perfectly parallel to one another will result in focus shifts. Or if the lens mount is say just a hair thicker than it should be, you may lose the ability to focus to infinity.
Now Reflex isn’t the first company to ever try making a 35mm camera with interchangeable backs. Zeiss, Adox and Mamiya all tried and later abandoned cameras with interchangeable magazines many decades ago. Notably none of the major camera manufacturers ever attempted it. This alone should be a red flag – if it was ever a good idea, why didn’t it catch on during the heydays of film photography? Why was there never a Nikon or Canon pro body where you could swap films on the fly? Why did interchangeable backs remain the sole preserve of medium and large format photography?
Perhaps you think I’m being overly critical and not giving enough credit to advances in manufacturing technology that have come about over the last couple of decades, and perhaps you’re right. But yesterday I had an email from Reflex admitting that of course they had no chance of meeting their deadline for shipping this year and bizarrely announcing a whole raft of new products, including a mini lab film processor, a film scanner and a series of lenses. Apparently this is needed for economies of scale with as yet unfound manufacturing partners. Although what components will be shared between a mini lab film processor and an SLR I really have no idea. What should really worry anyone who’s invested more in this Kickstarter than the £25 for a camera strap, is that over half a year later it sounds very much like they’re still struggling to find companies to make the camera’s parts. Introducing more complexity by designing other non-trivial products is either an act of desperation or madness. Remember another Kickstarter project, the Lab Box film processor, also from last year? That was a much simpler product than what it sounds like Reflex is proposing with their mini lab and raised around half a million pounds, nearly four times what Reflex did – and even that hasn’t shipped yet nearly a year after it was promised.
Anyway I honestly hope Reflex succeeds and manages to ship some kind of camera because I don’t want to see the backers out of pocket or another negative headline about film photography. However for that to happen I think they are going to have to really reassess what they can and can’t deliver in a version 1.0 product on a shoestring budget.
Addendum:
I’ve exchanged some comments with Reflex on Kickstarter and they say that they’ve been planning to build out an ‘ecosystem’ under the Reflex brand since day one. But they hadn’t articulated what other products that might encompass until now for strategic reasons.
I said I thought they should be more transparent about their operations and funding, noting that the mini lab project alone is a major undertaking and going to require significant funding to come to fruition. How many people would have plunked down £500 or more for a camera if they knew it was being developed along side other complex products? Surely that’s an undisclosed and significant risk? It seems like the profits from selling these other items is intended to help fund the Reflex camera which in itself raises more questions. I imagine if you’d asked anyone at the outset of the Reflex campaign what they understood ‘ecosystem’ to mean, they probably would have said more lens mounts, branded camera straps and so on, rather than lenses, a film processor and scanner. They almost certainly wouldn’t have expected the development of multiple complex products in tandem and presumably launching before the camera they were being asked to fork over money for.
I still remain some what dubious about the claims developing these other products is going to really save them any serious money that isn’t simply going to be eaten up by more R&D, tooling and assembly costs. I guess we’ll see. If they can deliver on all their promises it will be a major boon to the film community – but there are a lot of risks, both in the design of the Reflex camera, as I note above, and in these new products. Things will be interesting to watch unfold – all I can say is that I’m glad I don’t have £350 (or more) on the line.
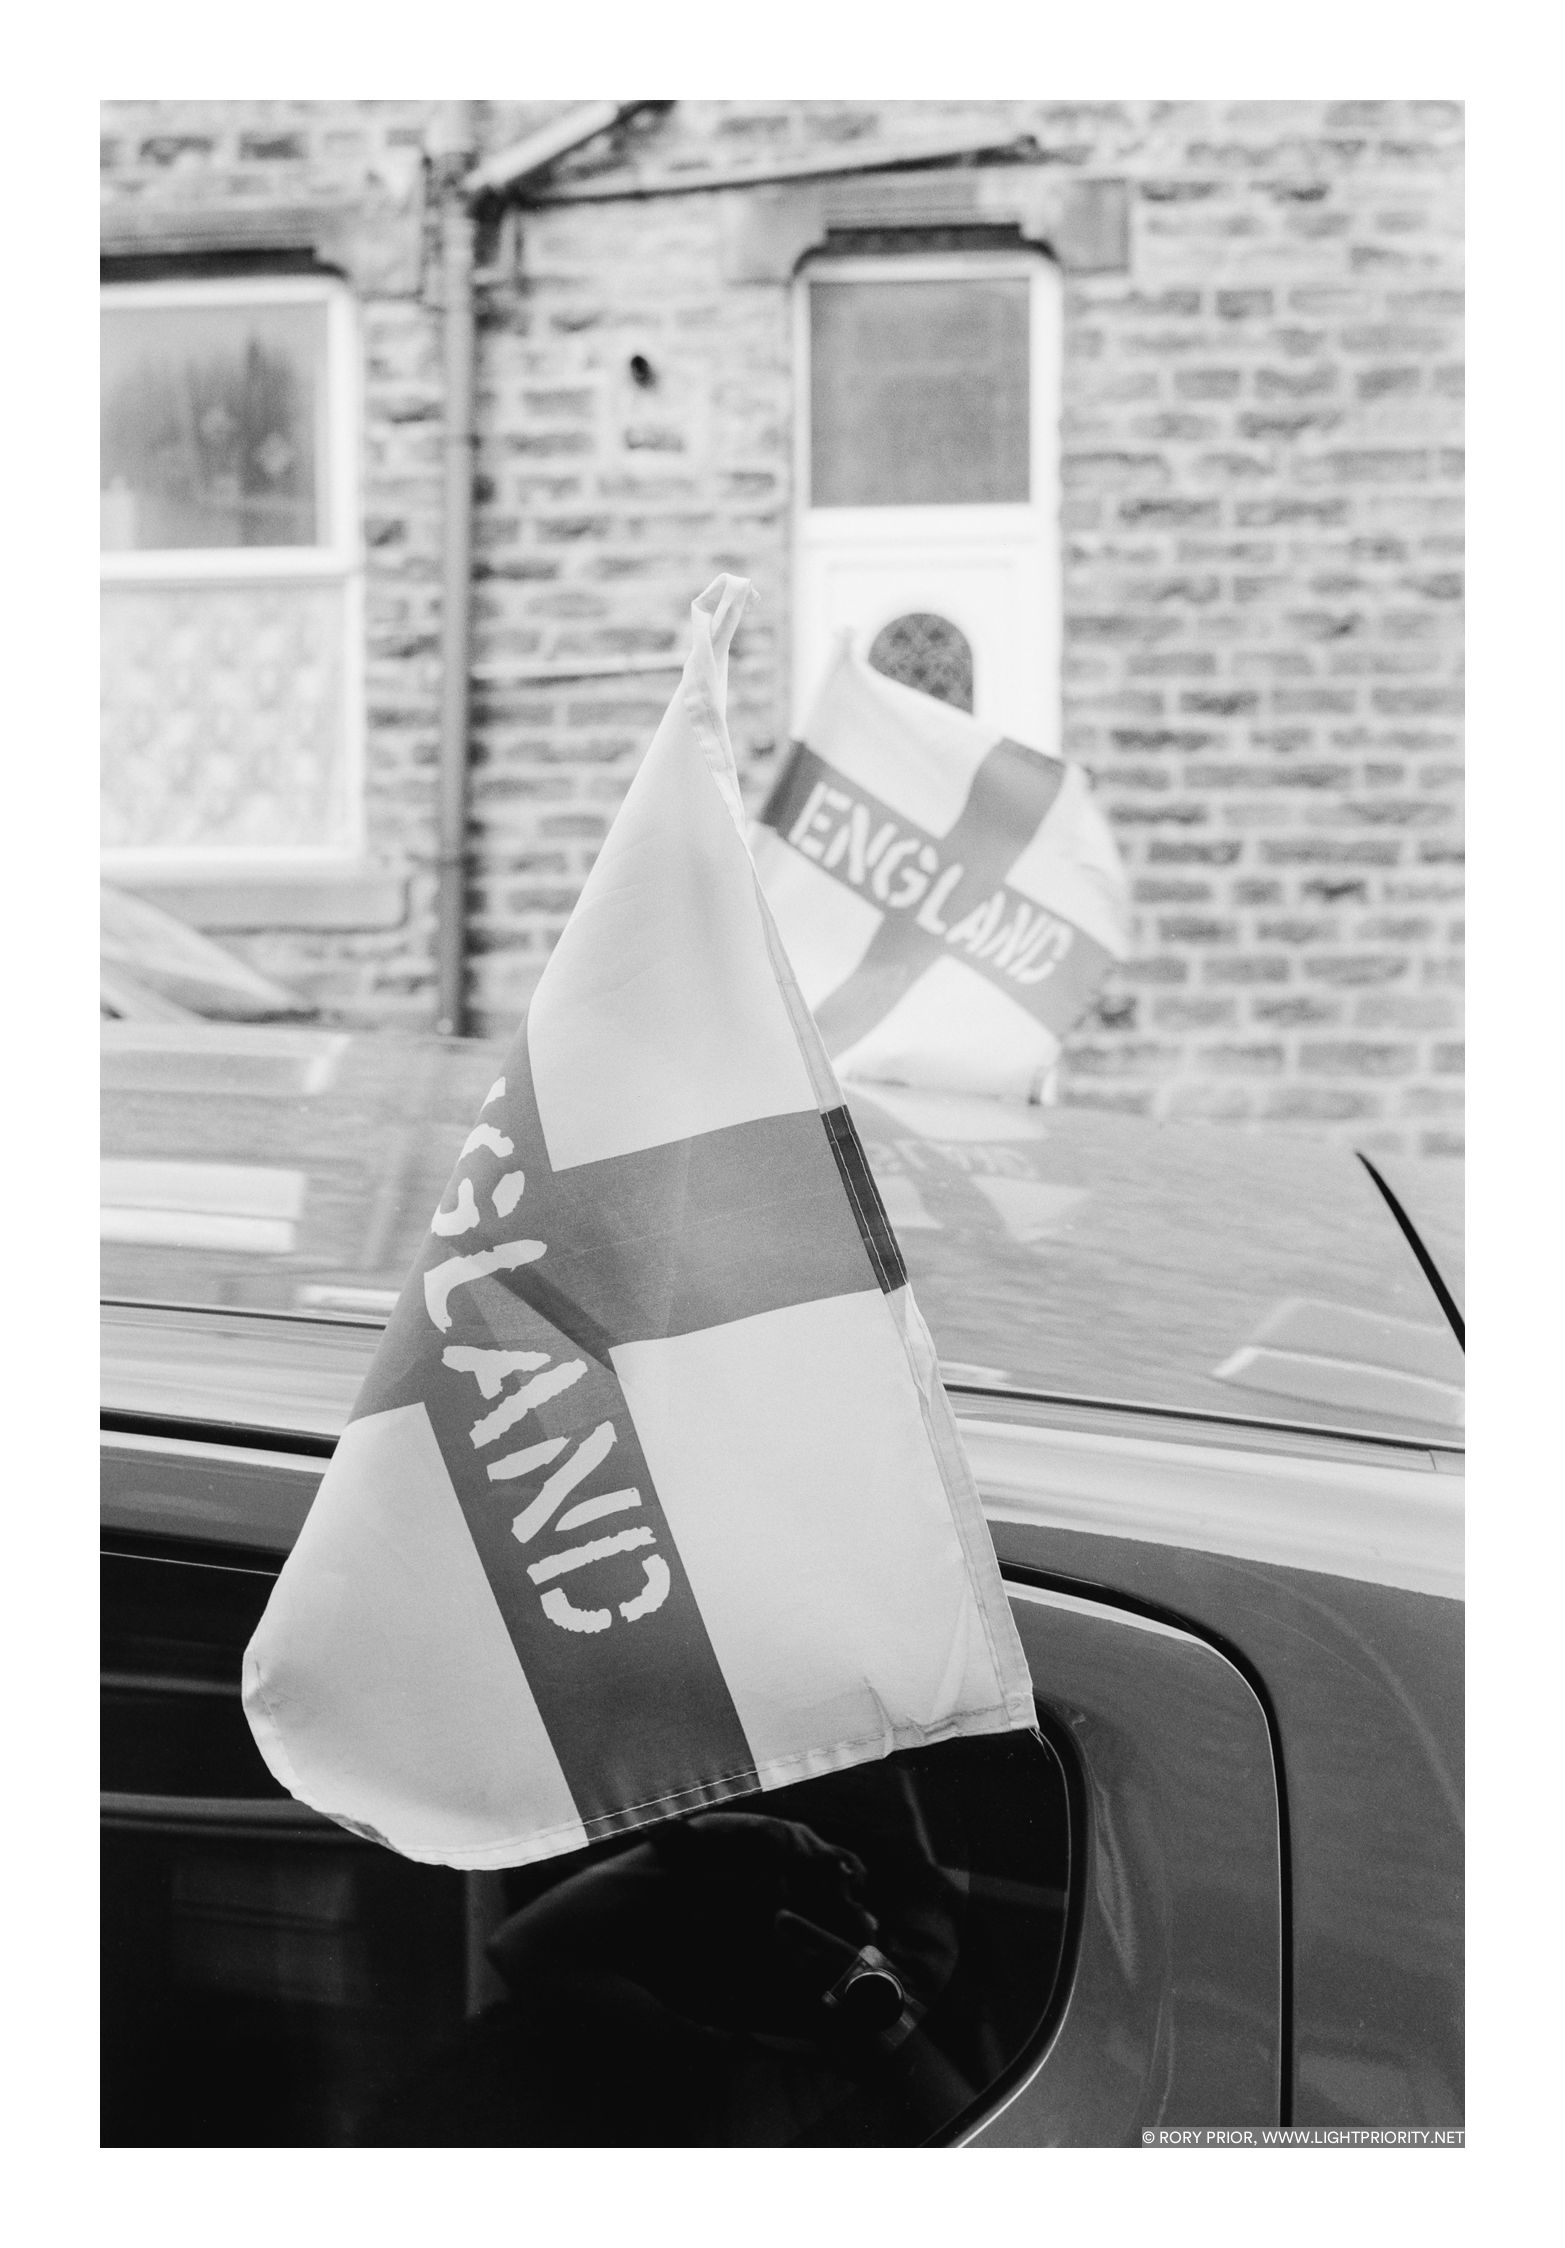
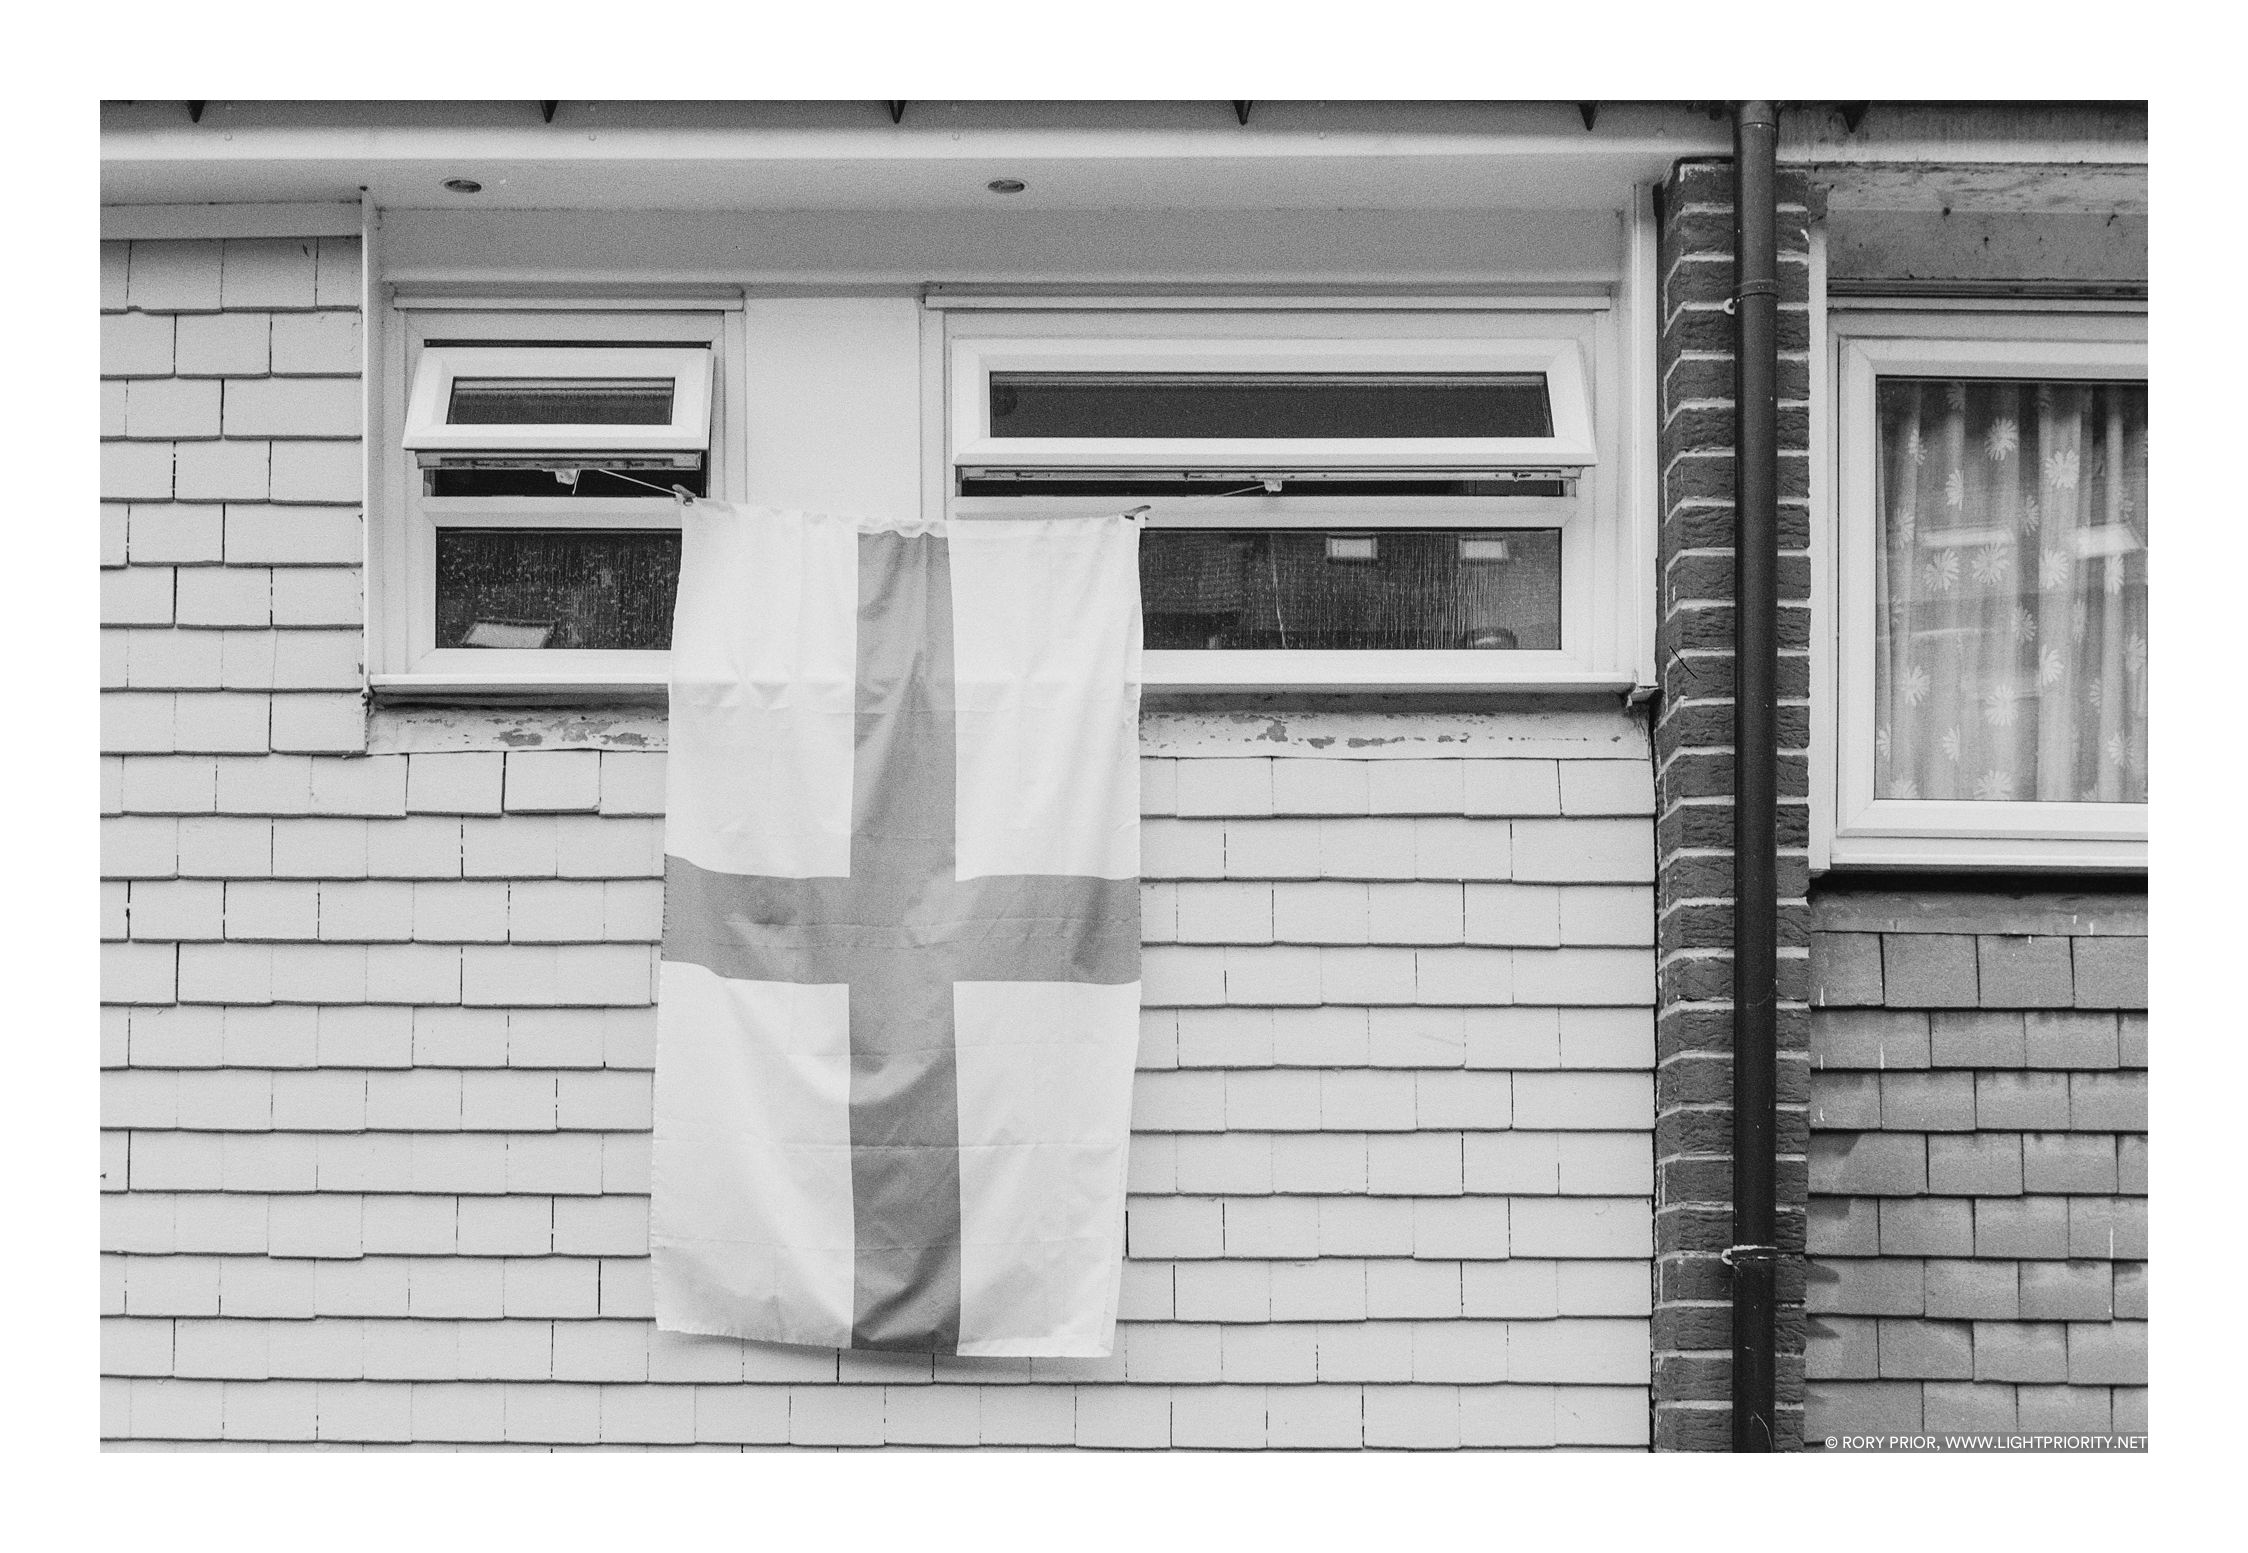
I should preface this by saying I’m really not that interested in football, and find myself somewhat bemused by the wave of fervent excitement (and almost always dashed hopes) that wash over the nation every 4 years with the World Cup. But this year was a little different, for once our team actually did fairly well, and I found myself fascinated by the St. Georges flags that were suddenly popping up everywhere. The idea for a project sparked into my mind. So here I give you, Hopes & Dreams. A mini project documenting how England’s brief blaze of glory at the 2018 World Cup expressed itself in the windows, on the cars and down the streets of my corner of West Yorkshire. All shot on my newly acquired Pentax MX on a mix of Fuji Neopan Acros 100 & ADOX Silvermax 100.
Football did indeed, for a little while, come home.
![Light Priority - Photography by Rory Prior]](https://lightpriority.net/wp-content/uploads/2020/05/fulllogo.png)