![Light Priority - Photography by Rory Prior]](https://lightpriority.net/wp-content/uploads/2020/05/fulllogo.png)
A quick history lesson: X-Trans vs Bayer
Since the introduction of the X-Pro 1 four years ago, the majority of Fuji X Series cameras have sported image sensors with an unconventional colour filter array which Fuji calls “X-Trans”. If you’ve come to the Fuji system from any other brand of camera, or indeed earlier Fuji cameras, including the first generation X100, you’ll have been using cameras with traditional bayer colour filters. Bayer filters use a simple repeating pattern of red, green and blue pixels, the information from which is then combined to determine the actual colour of a given pixel in the resulting photograph. A system of 2×2 pixels is used, with two green, one red and one blue. Now because it doesn’t record full colour information at each pixel site, to get the end result a process known as demosaicing is involved. This is basically using maths to try fill in the missing information to recreate the original scene. It’s not perfect but it generally does a good job and because it’s been the standard since the dawn of digital photography, popular image processing tools like Lightroom and Photoshop process it well.
However the bayer pattern does have a significant drawback – a uniformly repeating pattern of pixels is prone to producing moire (interference patterns) when capturing textures with their own fine repeating patterns, for example in fabrics or buildings viewed from a distance (windows, bricks, tiles etc). To overcome this another filter is thrown into the mix known as an anti-aliasing or low pass filter. This slightly blurs the resulting image but greatly reduces the risk of moire from occurring.
This wasn’t good enough for Fuji, so they decided to try a novel colour filter array so they could do away with the low pass filter and still limit the occurrence of moire. Taking inspiration of the random grain arrangement in silver halide film, they developed the X-Trans sensor with its unique 6×6 arrangement of red and blue pixels that alternate position in each 3×3 block. They also reduced the number of red and blue pixels in each 9×9 block to just 8 of each, resulting in more green pixels than a bayer sensor.
Removing the low pass filter succeeded in allowing Fuji to make higher resolution images with the same basic 16 megapixel sensor as their competitors and largely succeeds in limiting moire. However it also created a huge headache for those of us who like to shoot in RAW and develop our images with popular tools like Lightroom and Photoshop. Demosaicing X-trans data is far more processor intensive than bayer because the math involved is inherently more complicated. Instead of dealing with a repeating 2×2 pattern, you’re now dealing with a 6×6 one. Worse still you’ve got less red and blue information to reconstruct the original colours of the scene from as well. This makes processing the images slower and can result in a number of undesirable visual artefacts such as areas of false colour and colour smearing. Early support from Adobe in Camera RAW and Lightroom was pretty terrible, leaving us with far from desirable results. Thankfully other vendors like Iridient, Capture One and eventually even Apple, showed you could get very good results from X-Trans with the right algorithms. With help from Fuji and under pressure from users and competitors Adobe finally stepped up their game and improved their processing of Fuji RAW files to a level close to, if not quite on par, with the best of what their competitors were producing.
X-Trans in Lightroom
So that’s how we got here and why processing Fuji RAW files is still not quite as straightforward as you may be accustomed to. From doing my own research and experimenting these are my tips for getting the best results from Lightroom and managing some of the remaining niggles. The following tips should work for users of Lightroom 5, 6 and CC.
Note that these settings are not really aimed at portraiture where a slightly softer image is often desired.
Getting maximum detail
All those extra green pixels are great for capturing a bit more luminance information and the demosaicing process does a really good job of suppressing colour noise. So when shooting ISO 800 and below in most cases you can completely turn off colour noise reduction. Below ISO 1600 you can also often reduce or completely turn off luminance noise reduction. You’ll get slightly more grain, but you’ll keep a lot more fine detail.

X-Trans files can quickly look terrible with over sharpening, in the majority of cases it’s best to leave the sharpness setting at it’s default of 25. Instead to squeeze more detail out of the shot, you can be liberal with the application of the detail slider. I find around 80 tends to work well for most images without looking overdone. You may need to pick lower levels or push up noise reduction slightly at higher ISOs to avoid the grain getting overly emphasised.
Mouse over this image to see the difference these settings make on this 100% crop:

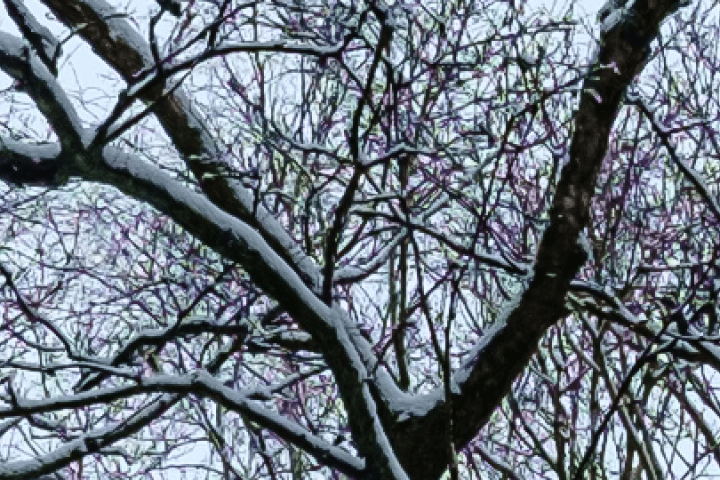
Areas of fine detail with strong contrast can produce blobs of false colour. I find bare tree branches against a light sky are particularly bad for this. Luckily the false colour is often cyan or purplish like chromatic aberration, which makes it easy to correct using the brush tool with defringe cranked up to 100.
As the effect is quite subtle here I’ve zoomed this sample up to 200% to make the areas of false colour more obvious. You should be able to notice the purplish and greeny blue patches amidst the branches. Mouse over to see the effect the brush tool had on remove them.
Note: It’s also well worth having the automatic chromatic aberration removal option checked. Most of Fuji’s lenses are excellent and produce very limited aberrations, but a few like the 18mm f2 need some extra help in this department.
Going the Extra Mile
There are some images that just seem to break Lightroom’s algorithms. I’ve had curious grids of repeating pixels and checkerboards appear in thin red lines. For these the only solution is to process the RAW file in another program first. On the Mac the best choice is Iridient Developer. I’m less familiar with the options available on Windows, but Iridient now have a solution for that platform too.
Some of Fuji’s lenses have moderate optical distortion and in correcting it a lot of sharpness is lost in the corners. For images where the distortion isn’t a problem, turning it off will yield better overall image sharpness. Unfortunately Adobe won’t let us turn off the correction so using a 3rd party processor becomes the only option.
Another option is to simply perform image sharpening in another program, for example by exporting to Photoshop and using one of the myriad of sharpening filters available there. This lets you bypass Lightroom’s limited sharpening tools altogether while otherwise maintaining your workflow. You will end up with some massive tiff files though, so perhaps this is a solution that is best only employed on a case-by-case basis.
If you have any other X-Trans file handling tips feel free to leave them in the comments below!


