From the Archives #14

From the Archives #14

This shot was taken in Sheffield last autumn and had been forgotten about until I rediscovered it the other day. Even though I try and run a fairly tight Lightroom catalogue and make periodic purges of poor, duplicate or uninteresting shots, it’s hard not to accumulate thousands of images and quickly lose things you don’t flag for further attention.

This shot was actually processed in camera, because try as I might, I couldn’t get the colours looking how I wanted in Lightroom. Fuji’s film simulations (in this case with a bit of custom pushing and pulling) can produce some great results.

Fuji 60mm f2.4 R Macro Long-term Use Review

Fuji 60mm f2.4 R Macro Long-term Use Review

The very first lens I bought to go with my X-E1 kit back in 2013 was the 60mm f2.4. Back then there were precisely 4 X-mount lens to choose from; the 18mm, the 35mm, the 60mm and the 18-55mm zoom. Not much compared to today’s lineup! At the time I wanted a lens I could use for some portraits at a friend’s wedding, so I bought the 60mm as it’s a reasonable focal length for that purpose.

Unfortunately the day of the wedding was incredibly gloomy and overcast, to top it off the venue itself was very dimly lit. If you remember what it was like trying to shoot an X-E1 on 1.0 firmware with the 60mm 2.4 also on 1.0 firmware back then, you can probably guess that things did not go well! The focus was grindingly slow and frequently failed entirely, I got a few shots, but overall the experience had me wondering if I’d made a terrible mistake switching away from a DSLR.

Thankfully over time the firmware of both the X-E1 and lens were improved and the performance moved from nearly unusable in imperfect light to just about passable. In good light the lens performance was already much better and while still no speed demon, subsequent updates have helped to make it a little snappier. Where it fell down in speed, it made up for it in rendering; producing images packed with detail and with a lush creamy bokeh that blew my 18-55mm wide open at 55mm out of the water. I grew to really enjoy using it for landscape, street and the odd bit of macro photography.

After about two years of using and enjoying the lens tremendously I found myself starting to get a lot of missed shots where the camera had claimed to focus and where the image looked sharp enough in the viewfinder, but where the whole image was noticeably out-of-focus when viewed up large. I’m not sure if this was just a run of bad luck, the result of a firmware update or something else (the lens would still reliably focus enough that I was sure it wasn’t broken). Anyway I decided I’d had enough, so I put it on eBay and bought the 55-200mm f3.5.-4.8.

A few months later I found myself in possession of an X-T10 and missing the 60mm as a compact and lightweight short telephoto option. With a holiday coming up that I wanted to pack fairly lightly for, I decided I’d reacquire a copy of the 60mm and give it a second chance. After looking on eBay I found one in mint condition at a bargain price of £219 and snapped it up. I’m pleased to say the performance and focus accuracy of the lens paired with the X-T10 is hugely improved. It’s still not going to satisfy those trying to capture fast action, but for most other uses it’s now a solid performer and I’ve not had any more false focus confirmations.

13-03
[exif id=”1348″]

Build and Handling

As with all Fuji XF lenses, the 60mm is well made in a mixture of quality plastics and metal. As one of Fuji’s older lens designs, it’s doesn’t feature internal focusing and the front element can extend out of the lens barrel by around an inch at macro distances. At non-macro working distances it barely moves from the main lens body at all.

The lens features an awkward 39mm filter ring size, which it shares only with Fuji’s 27mm f2.8 pancake lens and precious little else from other manufacturers. This can make finding filters a challenge. To make matters worse, Fuji decided to recess the filter thread behind the outer ring of the lens barrel. This means the only way you can fit a step-up adapter is to knock out the glass from a 39mm UV filter and use that as a go between to give the necessary clearance from the filter ring to the front of the lens. It’s a messy solution, but if you need to use ND filters or a polariser it may be your only option. If Fuji ever releases a mark 2 version of this lens I hope it’s an area they address.

The 60mm has a large, smooth turning focus ring that will let you dial in precise adjustments when shooting in macro. The only downside to this is that it can make demounting the lens a little tricky, as there’s very little of it that is non-rotating. The aperture ring offers a decent level of resistance and isn’t too easy to change accidentally (unlike say the 35mm f1.4 or the 14mm f2.8).

As one of the original three lenses that launched the X series, Fuji was kind enough to bundle a high quality metal hood, complete with vents to improve its handling on X-Pro bodies. The hood is really big – it nearly doubles the overall length of the lens when attached. I find I rarely carry mine any more. The front element is deeply recessed already, so the hood doesn’t offer that much more physical protection and it’s already fairly hard to make the lens flare. The hood can be reversed for storage, but unfortunately then completely blocks the aperture ring and makes it near impossible to dismount the lens from the camera body.

Note: The three original Fuji lenses (18, 35 & 60) all share the same physical hood mount, which makes them interchangeable – albeit with caveats. On the 60mm the 18mm’s hood will block the front element at macro distances but I hear the 35mm’s hood will work quite well with it and doesn’t vignette.

Optical Performance

As I mentioned in the build up, the detail and overall rendering from this lens is very pleasing. It produces lovely creamy bokeh and thanks to its 9 blade aperture, out-of-focus highlights remain nice and round even when stopped down – a feature that curiously sets it ahead of Fuji’s fast portrait primes. You can get decent subject separation at f2.4 when shooting portraits, although obviously it’s not in the same league as the 56mm f1.2.

_DSF3935
[exif id=”1311″]

The 60mm isn’t fully optically corrected and some digital distortion correction is applied both in camera and by Lightroom. The only way to avoid that correction is to use a RAW processor that lets you turn it off, such as Iridient Developer. Thankfully the corrections applied have a minimal impact on the overall image quality which remains high throughout the range, only really falling off as you start to push past f11. In my limited testing so far, the 60 seems to hold its own on the new 24 megapixel X-Trans 3 sensor.

60-corrected

Roll over this image to see the pincushion distortion that the lens has when uncorrected. The slight change in colours is down to one image being processed in Lightroom and the other in Iridient.

It’s easy to forget this is a macro lens as I find it such a versatile focal length for landscape and portraiture – but it does have the ability to focus as close as 26cm (just under 1ft) and produces a 1:2 magnification. That certainly won’t satisfy hardcore macro shooters, but as a handy addition to an already versatile lens it’s a welcome feature.

Common Blue Damselfly
[exif id=”791″]

Closing Thoughts

I think the 60mm has always been a bit of an underrated lens in the XF lineup. Being both optically very decent and a versatile focal length, but struggling to shake off its early reputation for sluggish performance. While that reputation used to be well deserved in the early days, Fuji has advanced focus speed in its recent cameras by leaps and bounds and the 60 benefits from that a lot. It will never be anyone’s first choice for fast paced sports or action photography and it will likely remain overshadowed by the 56mm f1.2 for portraiture. However for people like me, who have persevered and gradually been rewarded by Fuji’s kaizen philosophy, or those who are just now entering the Fuji system with a modern camera body, it’s a lens that has a breadth of utility that remains unmatched by any other prime on the X system. Portraiture, street, landscape, macro – no other single Fuji prime can offer that range of versatility at the present time. The 60mm will remain a very special piece of glass for the foreseeable future, despite its few quirks and shortcomings. Let me leave you with a selection of some my favourite images that I’ve taken with the 60mm over the last few years.

If you enjoy my images and reviews please consider buying a print from my store here or on Etsy.

11-12
[exif id=”1312″]

DSCF2931
[exif id=”1314″]

Whitby Colours
[exif id=”1315″]

20-01
[exif id=”1316″]


X100T Essential Accessories

X100T Essential Accessories

The X100 series cameras from FujiFilm are a joy to shoot with out-of-the-box, but they benefit enormously from a few essential accessories. These  improve the ergonomics, add a little physical protection from bumps and scuffs and make them even more gorgeous to behold.

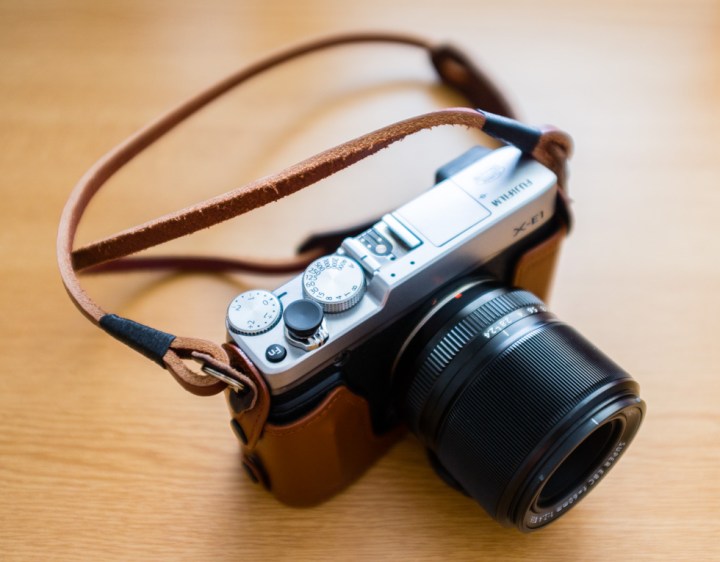
Fuji X100T Premium Leather Case

The Fuji case comes in two parts, a lower half-case that protects the bottom and sides of the camera and a removable upper case that protects the lens, rear screen and top of the camera, naturally you can’t use the camera while this part is attached.

I had the official Fuji case for my 1st generation X100, and while it looked great and provided good protection for the camera, it was a bit of a pain to use. You had to remove the whole lower portion just to change the battery or memory card. Not ideal on a camera that chews through batteries quickly. Thankfully since then Fuji has learned how to add little button up flaps to their cases to make the battery and SD card slot accessible. Unfortunately they are still omitting a tripod mount, so you’ll need to remove the case to mount the camera on anything. The case also blocks the ports on the side of the camera which is a nuisance if you need to use a cable to transfer photos or charge the battery.

The case is made of black leather (a brown version is also available) with a smooth, completely untextured finish. Inside it has a dark grey, felt-like lining. The case is secured to the camera by little loops that fasten over the camera’s strap lugs. When using a wrist strap the case is only secured on one side, but it has a snug enough fit to still remain firmly on the camera without flopping about or sliding off. Whether this will loosen up over time of course remains to be seen.

Speaking of the snug fit, this case was originally designed for the X100/X100S body, and the X100T made some minor changes to that which mean the fit is a little tighter. The alignment of the battery access flap isn’t quite perfect as a result and I find I have to gently press the camera into the front of the case in order for it to spring open. Not a big deal, but not ideal given the cost of the case. It’s also worth mentioning that you’ve no hope of securing the upper part of the case with any accessories attached, so you’ll need to remove thumb grip, filter adapter and lens hood. For me I find this relegates the upper case to when I need to protect the camera during travelling, where I’m not intending to actually shoot with it (e.g. buried in a rucksack).

Honestly I think Fuji could do a little better for the money they charge here. If you’re not fussed about having full camera protection you might want to look at some of the premium half-cases from other manufactures like Gariz.

LightPriority rating: 3/5

DSCF3167

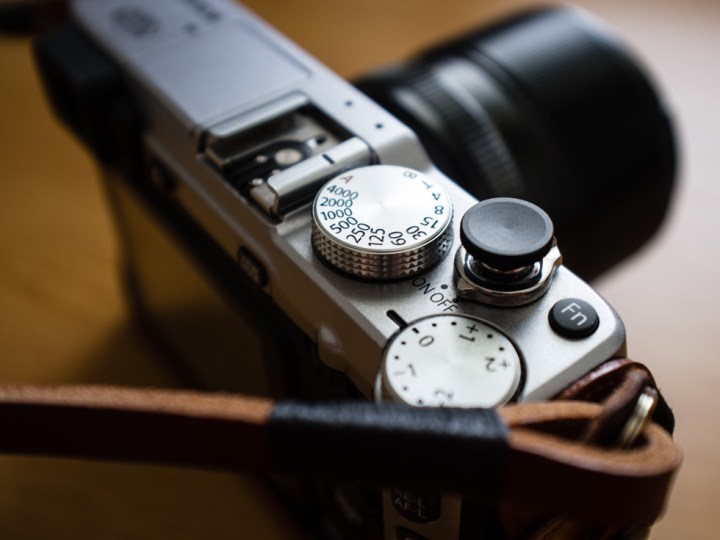
Lensmate LMX100T Thumb Rest

If I could only choose one accessory for my X100T, it would be a thumb grip – they make such a big improvement to the handling. Without one you only have a tiny area to actually grip the back of the camera without inadvertently interacting with the controls.

If you live outside Japan you only really have two choices* when it comes to quality thumb grips for Fuji cameras; Lensmate and Match Technical. Fuji actually make their own for various models, but only sells them in Japan. Match Technical charges astronomical sums for theirs, as they primarily target Leica customers, so most mere mortals will probably choose Lensmate.

Unfortunately getting hold of the Lensmate grip in the UK proved to be quite a headache. They only sell via their website and the first one I ordered went missing in the post. It took Lensmate’s customer service people a lot of persuading to send me a replacement, as it had been marked as delivered by the courier. When the replacement did come I inevitably got whacked with a customs charge.

Anyway delivery woes aside, the grip itself is excellent. It comes in a premium box with a magnetic clasp. It fits snuggly into the camera’s hotshoe and has a little rubber gripper underneath to ensure it’s not going to come out without a good tug. As it’s designed for the X100T specifically, it doesn’t block the drive button or command dial. A rubber bumper braces the grip against the side of the camera and a rubber pad inside the end of the grip helps to prevent your thumb slipping.

LightPriority rating: 5/5

* It’s worth noting you’ll find tons of cheap generic thumb grips on eBay/Amazon Marketplace, but most are poorly designed and are not targeted at any specific camera model. As they nearly all lack any kind of bracing against the camera body, they put a lot of leveraging force on the hotshoe, which overtime is likely to damage your camera.

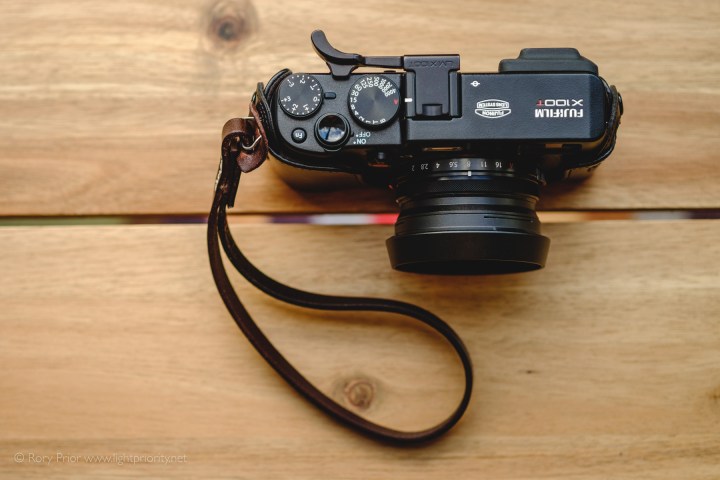
Cam-In Leather Wrist Strap

I’ve always been a neck strap kinda guy, as I prefer to keep my hands free, but as I often carry my X100T in addition to my X-T10, having both on neck straps quickly gets impractical. I was tempted to get another Gordy’s strap as I love the one on my X-T10, but burned by my recent experience buying from the US with Lensmate, I decided to try buying a strap from a UK company called Colourful Camera Accessories. They didn’t have a huge selection of wrist straps, so from the limited selection I opted for a Cam-In brown leather model.

Despite being described as brown, it’s so dark in colour as to almost look black. Still the colour works well with my black X100T and case, so no problem there. The leather is a bit on the thin side (about half the thickness that Gordy’s use) but should be sufficient to handle the weight of the X100T without any undue risk. As with all leather products, it takes time to break in and soften up, so I expect the comfort using it to improve over time. Overall it’s decent enough quality, but not up to the standard of Gordy’s – which is disappointing given the comparable price.

LightPriority rating: 3.5/5

DSCF3144

Domke F-5XA Shoulder Bag

After a lot of research trying to find a good quality compact camera bag, suitable for a mirrorless camera with one or two small lenses, I finally settled on the Domke F-5XA. It’s ideal for holding a camera the size of the X100T, along with a mini-tripod or converter lens. If you don’t plan to stow your camera itself, the bag is handy for holding a couple of lenses and other accessories in combination with an interchangeable lens Fuji.

The bag is made from tough canvas that has been treated to be water resistant – I can vouch that it certainly resists light rain well. A flap secured by velcro hides the two front pockets and a chunky zipper guards the main compartment. The front pockets are suitably sized for spare batteries or filters (but not much else)

The easily detachable strap has rubber cords woven into it that make it very grippy and unlikely to slip from your shoulder. This is far preferable to those Velcroed on shoulder pads you get with many camera bags, that always end up slipping down the strap.

The only real niggle I have is that the bag only comes with one internal separator which can make organising smaller accessories tricky. Handily I found a divider from another old camera bag that was the right size and used that to create a very narrow pocket just big enough for a LensPen, white card and spare battery.

I have the black version of the bag which manages to look fairly anonymous, even with the Domke logo emblazoned on one corner in red lettering. The bag also comes in khaki and olive green colours, but not Domke’s “Rugged Wear” waxed finish.

LightPriority rating: 4.5/5

DSCF3173

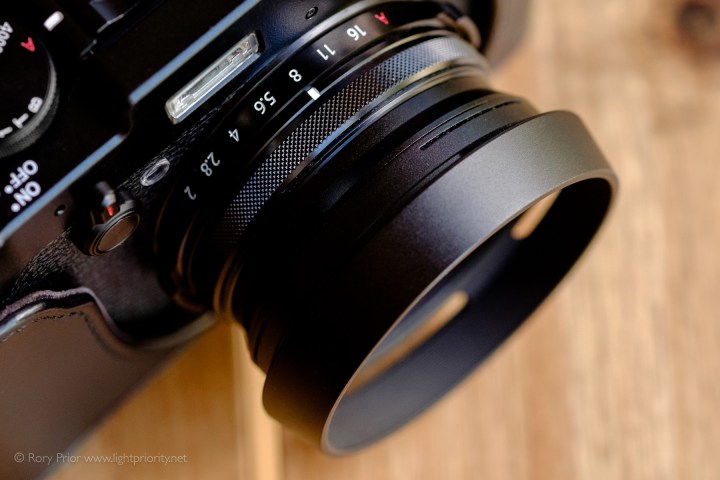
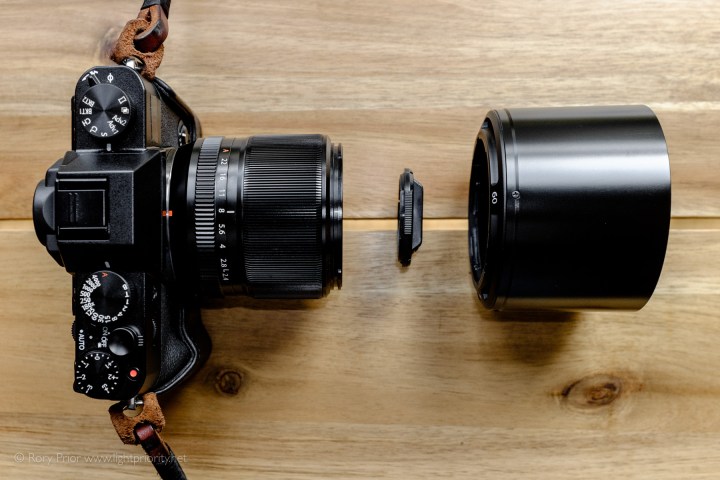
JJC Lens Hood & Filter Adapter

Aside from the white printed JJC logo, this is identical to Fuji’s far more expensive hood and filter adapter. As with Fuji’s offering, it part blocks the optical viewfinder and the hood is non-reversible. JJC do make a smaller domed lens hood which I’m hoping to try soon. That should block the OVF no more than just the plain filter adapter. Unfortunately the JJC hood doesn’t come with the little fabric pouch that the official Fuji model has, but then it’s a fraction of the price so it’s hard to complain.

LightPriority rating: 5/5

I hope these mini-reviews are helpful to X100 series camera owners. It might seem a little over the top adding tons of accessories to a camera, but they really do add to the overall experience and make the camera even more of a pleasure to shoot with. If you have any questions about any of the gear I’ve reviewed here, leave a comment and I’ll try and answer as best I can.

If like my images and reviews and would like to help support the site, please consider buying a print.

Getting the most from X-Trans in Lightroom

A quick history lesson: X-Trans vs Bayer

Since the introduction of the X-Pro 1 four years ago, the majority of Fuji X Series cameras have sported image sensors with an unconventional colour filter array which Fuji calls “X-Trans”. If you’ve come to the Fuji system from any other brand of camera, or indeed earlier Fuji cameras, including the first generation X100, you’ll have been using cameras with traditional bayer colour filters. Bayer filters use a simple repeating pattern of red, green and blue pixels, the information from which is then combined to determine the actual colour of a given pixel in the resulting photograph. A system of 2×2 pixels is used, with two green, one red and one blue. Now because it doesn’t record full colour information at each pixel site, to get the end result a process known as demosaicing is involved. This is basically using maths to try fill in the missing information to recreate the original scene. It’s not perfect but it generally does a good job and because it’s been the standard since the dawn of digital photography, popular image processing tools like Lightroom and Photoshop process it well.

However the bayer pattern does have a significant drawback – a uniformly repeating pattern of pixels is prone to producing moire (interference patterns) when capturing textures with their own fine repeating patterns, for example in fabrics or buildings viewed from a distance (windows, bricks, tiles etc). To overcome this another filter is thrown into the mix known as an anti-aliasing or low pass filter. This slightly blurs the resulting image but greatly reduces the risk of moire from occurring.

This wasn’t good enough for Fuji, so they decided to try a novel colour filter array so they could do away with the low pass filter and still limit the occurrence of moire. Taking inspiration of the random grain arrangement in silver halide film, they developed the X-Trans sensor with its unique 6×6 arrangement of red and blue pixels that alternate position in each 3×3 block. They also reduced the number of red and blue pixels in each 9×9 block to just 8 of each, resulting in more green pixels than a bayer sensor.

Removing the low pass filter succeeded in allowing Fuji to make higher resolution images with the same basic 16 megapixel sensor as their competitors and largely succeeds in limiting moire. However it also created a huge headache for those of us who like to shoot in RAW and develop our images with popular tools like Lightroom and Photoshop. Demosaicing X-trans data is far more processor intensive than bayer because the math involved is inherently more complicated. Instead of dealing with a repeating 2×2 pattern, you’re now dealing with a 6×6 one. Worse still you’ve got less red and blue information to reconstruct the original colours of the scene from as well. This makes processing the images slower and can result in a number of undesirable visual artefacts such as areas of false colour and colour smearing. Early support from Adobe in Camera RAW and Lightroom was pretty terrible, leaving us with far from desirable results. Thankfully other vendors like Iridient, Capture One and eventually even Apple, showed you could get very good results from X-Trans with the right algorithms. With help from Fuji and under pressure from users and competitors Adobe finally stepped up their game and improved their processing of Fuji RAW files to a level close to, if not quite on par, with the best of what their competitors were producing.

X-Trans in Lightroom

So that’s how we got here and why processing Fuji RAW files is still not quite as straightforward as you may be accustomed to. From doing my own research and experimenting these are my tips for getting the best results from Lightroom and managing some of the remaining niggles. The following tips should work for users of Lightroom 5, 6 and CC.

Note that these settings are not really aimed at portraiture where a slightly softer image is often desired.

Getting maximum detail

All those extra green pixels are great for capturing a bit more luminance information and the demosaicing process does a really good job of suppressing colour noise. So when shooting ISO 800 and below in most cases you can completely turn off colour noise reduction. Below ISO 1600 you can also often reduce or completely turn off luminance noise reduction. You’ll get slightly more grain, but you’ll keep a lot more fine detail.

lightroom

X-Trans files can quickly look terrible with over sharpening, in the majority of cases it’s best to leave the sharpness setting at it’s default of 25. Instead to squeeze more detail out of the shot, you can be liberal with the application of the detail slider. I find around 80 tends to work well for most images without looking overdone. You may need to pick lower levels or push up noise reduction slightly at higher ISOs to avoid the grain getting overly emphasised.

Mouse over this image to see the difference these settings make on this 100% crop:

Mouse over to see effect of changed Lightroom settings

Areas of fine detail with strong contrast can produce blobs of false colour. I find bare tree branches against a light sky are particularly bad for this. Luckily the false colour is often cyan or purplish like chromatic aberration, which makes it easy to correct using the brush tool with defringe cranked up to 100.

As the effect is quite subtle here I’ve zoomed this sample up to 200% to make the areas of false colour more obvious. You should be able to notice the purplish and greeny blue patches amidst the branches. Mouse over to see the effect the brush tool had on remove them.

Mouse over to see effect of changed Lightroom settings

Note: It’s also well worth having the automatic chromatic aberration removal option checked. Most of Fuji’s lenses are excellent and produce very limited aberrations, but a few like the 18mm f2 need some extra help in this department.

Going the Extra Mile

There are some images that just seem to break Lightroom’s algorithms. I’ve had curious grids of repeating pixels and checkerboards appear in thin red lines. For these the only solution is to process the RAW file in another program first. On the Mac the best choice is Iridient Developer. I’m less familiar with the options available on Windows, but Iridient now have a solution for that platform too.

Some of Fuji’s lenses have moderate optical distortion and in correcting it a lot of sharpness is lost in the corners. For images where the distortion isn’t a problem, turning it off will yield better overall image sharpness. Unfortunately Adobe won’t let us turn off the correction so using a 3rd party processor becomes the only option.

Another option is to simply perform image sharpening in another program, for example by exporting to Photoshop and using one of the myriad of sharpening filters available there. This lets you bypass Lightroom’s limited sharpening tools altogether while otherwise maintaining your workflow. You will end up with some massive tiff files though, so perhaps this is a solution that is best only employed on a case-by-case basis.

If you have any other X-Trans file handling tips feel free to leave them in the comments below!

Fuji XF 14mm f2.8 R review

Fuji XF 14mm f2.8 R review

Let’s just start by saying I’m really excited by this lens. I used to own the really nice Samyang 14mm f2.8 when I shot Nikon and it’s a focal length I’ve missed since switching to Fuji. For the last couple of years a Samyang 8mm fisheye was my fallback ultra-wide option, but fisheyes have limitations and I found I was using mine less and less. As a result I decided to sell it a few months ago. That left me with the 18mm f2 as my widest lens. The 18mm is a good lens, but it does have its shortcomings optically and I found myself yearning for something that could produce more dramatic results for landscape and street work. I did seriously consider Samyang’s new 12mm f2 ultra-wide angle, but I’ve read so many good things about the Fuji 14mm I decided to play it safe. I’m glad I did – this lens is clearly a winner.

Pros and cons of going wider

While 14mm (21mm equivalent) is not at the extreme end of the wide angle spectrum on APS-C, it’s enough to make photos look more dramatic and out of the ordinary. With the sheer ubiquity of 18-55mm (~28-85mm) lenses, people are used to seeing images at those focal lengths. That means lenses that break out of that range immediately have the potential to create more interesting pictures. The downside for the photographer is that it can make composition and getting the right exposure more complicated. You’ve potentially got to get a lot closer to subjects to make them fill your frame, then you have distortion to worry about, especially when shooting people. It’s often hard to keep bright light sources in the periphery out of your shot, which can throw off the camera’s metering causing under exposure or blown highlights. None of these things are insurmountable challenges, but they all take getting used to and are worth bearing in mind as they generally get more pronounced the wider the lens is.

14 vs 18

18mm vs 14mm

Compared to the Fuji 18mm lens (left), the 14mm is a fair bit bigger. It’s roughly the same size as the 60mm f2.4 or the 18-55mm f2.8-4 zoom. In fact it shares the same petal shaped, plastic (boo) lens hood with the latter. It has a 58mm filter thread which it shares with the 18-55mm, 16-50mm and 50-230mm zooms, but notably none of the other Fuji primes.

The 18mm is optically decent, (especially if you’re willing to work around its limitations in post*), but the 14mm is truly stellar. It shoots beautiful, sharp, undistorted images effortlessly. It’s already very sharp wide open at 2.8 and it really only gets better from there before diffraction starts to shave away at the sharpness past f8. But really most of the time you’re going to be using this lens from f2.8 to f5.6 where it really shines.

* The 18mm is hampered by chromatic aberration and the forced distortion correction both in-camera and in Lightroom loses you a lot of resolution at the image edges. For shots where resolution really matters it’s worth using a RAW processor that will let you disable this as it brings up the edge quality considerably (at the cost of some distortion natch).

Something presently only available on the 14mm and the 23mm f1.4, is the distance scale painted on the lens barrel and push-pull manual focus mechanism. When in autofocus mode, the focus ring is locked and won’t rotate. Pulling it back towards the camera body reveals distance markings and unlocks it with a satisfying click. The focus ring is range limited, with a 1/3rd turn moving it between infinity and near focus. The issue with this design is that there’s no way to autofocus and then tweak your focus manually. People who like to use manual mode and focus with the AE-L/AF-L button may be unhappy as a result. Personally I rarely use manual focus on AF lenses, but the distance scale and hard stopped focus ring will no doubt appeal to zone focus aficionados.

In use

Now if you’re after MTF charts or shots of brick walls, we’ll have to part ways here, but if you’d like to see some real life images shot with this lens then let’s plough on!

I’m lucky enough to live within easy travelling distance of the wonderful old English city of York, and where better to play with a wide angle lens than the cavernous, intricately detailed interior of York Minster Cathedral?

York Minster[exif id=”822″]

You’ll notice I’ve shot this at f10. That wasn’t intentional and it brings me to really the only negative point with this lens – the aperture ring is too loose and is very easily changed unintentionally. I find the 18mm and 60mm have about equal stiffness and aren’t too easy to jog once mounted, but the 14mm is definitely one to keep an eye on.

DSCF3924[exif id=”824″]

The lack of distortion (even with corrections disabled in RAW) is a major boon for anyone looking to shoot architecture. The focal length also makes getting sharp images handheld at low shutter speeds fairly easy. It was quite dim inside the cathedral so I found myself shooting 1/30 and even 1/15 sec on several occasions, despite this the majority of the shots I took were sharp and free from motion blur.

DSCF3929-2[exif id=”825″]

You definitely have to pay more attention to your composition with wider angle lenses, as I mentioned earlier. It’s not as extreme as shooting with a fisheye, where a few degrees up or down could ruin your image if you wanted a flat horizon, but it can still strongly impact the look of a shot. Attempting to keep verticals dead straight inclines you towards creating ’50/50′ images with the horizon bang in the centre. This can leave you with unwanted masses of sky or foreground when shooting landscape or architecture. A solution can be to tilt upwards a little then correct in post (Lightroom has fantastic tools for this and can even automate much of the process). Or of course you can try and find a higher vantage point! In this case I’ve left the shot as is, but you can see if I’d gone for straight verticals I’d have had a lot more chairs and tiled floor in the shot and lost much the fantastic vaulted ceiling.

DSCF3947-2[exif id=”826″]

This is my favourite shot of the day. Looking straight up at the ceiling of the main tower. It’s almost dizzyingly high. I’ve cropped this down a little bit to help with the symmetry, but you still feel the benefit of the 14mm, as gives you the leeway to do this that the 18mm wouldn’t. Even at f4 it’s fantastically sharp into the extreme corners. This is certainly a lens that will stand the test of time if Fuji moves to higher megapixel sensors in the future.

DSCF3989-2[exif id=”828″]

Of course the 14mm excels at grand landscapes too once you get outside. In this case after climbing 275 steps in claustrophobically narrow spiral staircases! Outdoors the challenge becomes balancing the exposure. It’s easy to throw off the metering by having so much bright sky in the shot. The advantage of shooting RAW is the huge dynamic range the X-trans sensor can capture. You can pull so much out of the shadows without things getting noisy, it can really save images where it appears you’ve completely lost areas to darkness. Hover over the image above to see the same shot with no adjustments applied. I’m happy to report I didn’t notice any problems with flare even when shooting with the sun just out of the corner of the shot. I imagine the smallish front element helps here.

Moving on to the National Railway Museum now, also in York, you can see another of the 14mm’s traits – incredibly close focus. In fact you can get to within 10cm of your subject and still be able to lock focus (you don’t even need to enable macro mode, which seems to have no practical effect with this lens). Bokeh is decent as wide angles go, although naturally it’s not quite as smooth and creamy as the 18mm f2 at close distances.

Train lamp[exif id=”837″]

DSCF3858[exif id=”838″]

Finally here’s one more shot from the museum. I’ve cropped it to 16:9 to further emphasis the cinematic look the lens gives to images. Wide angles like the 14mm are great for showing differences in scale, especially when you’ve got people in the shot.

Summary

I can really recommend this lens without caveats. Optically it’s stunning, it’s a good size, weight and balances well. The only real niggle is the loose aperture ring, and that’s something that’s easy to live with when the lens delivers such good results. Whether it’s right for you or not will depend on your shooting style and whether you prefer the versatility of a zoom or like a bag full of fantastic primes. I think I’m fairly heavily in the bag full of primes camp!

There are now quite a few wide angle options for the X mount: the 12mm f2.8 Zeiss Touit, the 12mm f2 Samyang, the 10-24mm f4 Fuji zoom and the 18mm Fuji at the narrower end, which is also covered by several of their general purpose zooms. There’s also a 16mm f1.4 Fuji due out later this year that will no doubt be an interesting optic. If you want a more extreme wide angle, the Zeiss and Samyang offerings are no doubt very good, although the Zeiss is pricey and the Samyang only manual focus. If you prefer zooms then the 10-24mm is also very good, but it can’t quite touch the overall optical quality of the 14mm based on the reviews I’ve seen, especially in the corners. It’s also getting a bit on the big and heavy side for my liking. If you’d like further reading, you can see a nice comparison between the Fuji wide primes and the 10-24mm on Fuji vs. Fuji.

~

If you’ve enjoyed this review, please consider supporting me and the site by purchasing a print from my store here or on Etsy.

The Right Stuff

The Right Stuff

There’s no denying that Fuji’s retro styled cameras are things of beauty as well as incredibly powerful photographic tools. With that in mind, when it comes to customising them to personalise and improve their ergonomics, it behooves us to complement rather than degrade that classic look.

The X100 Spoiled Me

I got my X100 secondhand on eBay, at the time for a very respectable sum of £659. It came with every accessory you could want – the leather case, the lens hood, soft release and even a Thumbs Up grip. After totting up the value of these accessories I was initially sorely tempted to put them up on eBay and just keep the X100 itself, but I quickly realised they really complemented the camera, not just visually but practically. The case protects the camera from knocks and scuffs and keeps off light rain. The Thumbs Up grip significantly improves the handling, making one handed operation much better. The lens hood is of course essential, especially with the X100’s lens being a little prone to flare. Although mainly it provides some protection to the front element and provides a useful 49mm filter ring. The only accessory I didn’t find myself using was the soft release, which has stayed in a drawer until recently finding a home on my X-E1.

As I got my X-E1 new I didn’t have the luxury of having several hundred pounds worth of accessories thrown in. Initially I tried my X100’s Thumbs Up on it as the top plate has basically identical dimensions. It fitted reasonably although needed to protrude a little further to mount properly. I quickly decided it was unnecessary. The bare X-E1 has better ergonomics than the X100 right from the outset and its larger lenses deter one handed use in my experience.

Half Case

When it came to getting a case I looked at some of the 3rd party half cases but decided to stick to Fuji in the end. The X100 leather case is lovely and very nicely made. Its main short comings are lack of a tripod mount and no access to the memory card and battery slot. The X-E1 half case fixes the most serious issue by making the memory card and battery slot accessible through a little flap. The X-E1 case also significantly improves the finger grip on the right side of the lens, giving you a better hold on the camera.

Where the X-E1 case falls down, is the supplied strap. To put it bluntly, it’s a piece of crap. The leather backed part is far shorter than the X100 version, the backing is cheap, plasticy and rough edged. I decided I needed to find a 3rd party strap to replace it almost immediately.

Neck Strap

I learned about Gordy’s Camera Straps from the excellent Fuji X Files blog. They custom build leather camera straps, letting you pick the exact length, colour, neck pad and lug covers. I was impressed with how reasonable the price was and decided to order myself one. I’m glad I did because it’s an excellent strap. Thick leather, very nicely finished. As with all leather goods it takes a little while to break-in, but after only a few photo walks it’s already becoming nice and supple.

DSCF0719

Soft Release

As I previously mentioned, I didn’t find the soft release necessary on my X100. The shutter button is big and comfortable enough to use unadorned. However the shutter button on the X-E1 seems slightly smaller and something about it doesn’t feel quite as sure beneath my finger. The soft release nicely corrects that and provides a big concave surface to rest my fingertip against. The shutter button is such a critical part of a camera getting the right feel is important.

Other bits and pieces

As a former Nikon shooter I’m used to having scuffed bits of plastic screen protectors on my cameras. With the X100 I didn’t bother, the full case keeps the screen well protected and I’ve yet to put the slightest mark on it. With the X-E1 I’ve not been quite so lucky and managed to put a slight scratch on the screen after just a couple of months. I’ve since bought a Swido Diamond Clear hard screen protector that is doing an admirable job of protecting it from further damage.

The other must have accessory for your Fuji camera is a bit less glamorous but critically important – spare batteries! The Fuji’s like to chomp through batteries at a speed that will shock DSLR owners who are used to weeks if not months between charges. I’ve got several generic spares for my X100 and a single spare for my X-E1. You can buy official batteries if you like, but I’ve not had any problem with generic ones.